5 Golf Exercises to Add 20+ Yards to Your Drive in 8 Weeks
If you could spend just 30 to 45 minutes in the gym two to three times per week and add over 20 yards to your drive while increasing your club head speed, would you do it? For most golfers, the answer is a resounding yes, yet many struggle to find the right exercises that actually translate to improved performance on the course. The disconnect between what golfers think will improve their game and what actually works is wider than most realize.
As a performance coach who works with athletes including golfers at THIRST Gym, I’ve seen a consistent pattern. Most golfers believe that adding distance to their drive comes down to arm strength and random gym sessions filled with exercises they see on social media. This approach not only wastes valuable time but often fails to address the real biomechanical factors that determine driving distance. The truth is that approximately 80 percent of your driving distance comes from your club head speed, and club head speed is directly tied to your body’s ability to generate rotational force and power through the kinetic chain.
The five exercises I’m going to share with you have been proven to add over 20 yards to driving distance in as little as eight weeks for the golfers I work with. These aren’t random movements or trendy exercises that look impressive but deliver minimal results. These are carefully selected exercises that address the specific strength, power, and mobility requirements needed to generate maximum club head speed while maintaining control and consistency throughout your swing.
You can also watch the video below that goes along with this article.
Understanding the Real Source of Golf Power
Before diving into the specific exercises, it’s critical to understand what actually creates distance in your golf swing. The golf swing is fundamentally a rotational movement that requires your body to generate force from the ground up, transfer that force through your hips and core, and ultimately express it through the club head at impact. This is what coaches call the kinetic chain, and any weak link in this chain will limit your overall power output.
Your hips serve as the primary engine for rotational power in the golf swing. When you address the ball and begin your backswing, you’re loading into your trail hip, creating what biomechanists call elastic energy storage. As you transition into your downswing, this stored energy needs to be explosively released through hip extension and rotation. The faster and more forcefully you can extend and rotate your hips, the greater the club head speed you’ll generate. This is why exercises that develop explosive hip extension and rotational power form the foundation of any effective golf strength program.
Additionally, your ability to maintain a stable, rigid core while your hips and shoulders rotate in opposition creates what’s known as the separation or X-factor in the golf swing. This separation between your shoulder turn and hip turn stores additional elastic energy that contributes to club head speed. Exercises that develop anti-rotational strength help you maintain this separation and control throughout the swing, preventing energy leaks that reduce power and consistency.
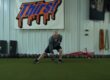
Exercise One: Rotational Medicine Ball Scoop Toss for Explosive Hip Power
The rotational medicine ball scoop toss stands as the premier power development exercise for golfers because it directly mimics the explosive hip rotation pattern used in the golf swing. For this exercise, you’ll need a medicine ball on the lighter side, typically between four and six pounds, with eight pounds being the absolute maximum for most golfers. You’ll also need either a solid wall to throw against or a training partner who can catch and return your throws.
To perform the rotational scoop toss, hold the medicine ball with both hands in an underhand grip, positioning your hands around the four and eight o’clock positions. Stand with your feet slightly wider than hip width, holding the ball at approximately belly button height. From this starting position, rotate toward your back hip pocket, allowing the ball to travel over your hip as you load into that trail hip. This loading phase mirrors the top of your backswing position. Now explosively rotate through your hips, driving them forward and around as you release the ball toward the wall with maximum force.
The key technical point that many golfers miss with this exercise is that the rotation should be driven primarily by hip extension and rotation, not by arm strength or shoulder rotation. You should feel your trail hip driving forward and rotating around toward the target as the primary movement, with your arms simply transferring that force into the medicine ball. If you find yourself using mostly arm strength to throw the ball, reduce the weight and focus on feeling your hips initiate and drive the movement.
For golfers who don’t have access to a wall, the recoil rollover medicine ball slam provides an excellent alternative. Start with the medicine ball in your left pocket if you’re working your left side. Your feet should be positioned slightly underneath your hips. Make a large circular motion with the ball, bringing it up and around your head before slamming it forcefully on the outside of your left foot. The goal is to create a powerful rotational slam while maintaining athletic posture and driving through your hips. Stand tall between each repetition, reset your position, and repeat. After completing your set on one side, switch to the other side to ensure balanced development.
From a programming perspective, I recommend performing three to five sets of five to eight repetitions per side for these power exercises. The repetitions are kept relatively low because the focus is on maximum explosive intent with each throw. If you’re performing more than eight repetitions per set, you’re likely not generating enough force per repetition, or you’re fatiguing to the point where power output decreases. Remember, the goal is explosive power development, not conditioning or endurance work.
Exercise Two: Lateral Bounds for Hip Stability and Lateral Power
The lateral bound exercise addresses a critical but often overlooked component of golf performance: lateral power and hip stability. While the golf swing is primarily rotational, the ability to generate force laterally and maintain single leg stability plays a crucial role in transferring power efficiently through your kinetic chain. This exercise requires nothing more than a small amount of open space and your own body weight, making it ideal for golfers who may not have access to extensive gym equipment.
Begin by balancing on one leg in a slightly athletic position with a soft bend in your knee and hip. Your arms should be positioned similarly to how you held the medicine ball in the scoop toss exercise. From this single leg stance, explosively swing your arms to the side while pushing off your standing leg, propelling yourself laterally through the air. Land on the opposite leg, stick the landing momentarily to demonstrate control, then reset and repeat in the opposite direction.
The athletic benefits of lateral bounds extend beyond simple leg strength. This exercise develops what coaches call reactive strength, which is your neuromuscular system’s ability to quickly transition from an eccentric loading phase to a concentric explosive phase. In golf terms, this translates to your body’s ability to rapidly load into your trail hip during the backswing and then explosively drive out of that hip during the downswing. The lateral component also challenges hip stability in the frontal plane, which helps prevent unwanted lateral sway during your swing.
Progressive overload with this exercise comes through increasing the distance you bound rather than adding external resistance. As you become more proficient, challenge yourself to push farther with each bound. For golfers who need additional stability support initially, you can land on both feet briefly before transitioning to single leg balance, or you can perform the landing on one leg, catch yourself quickly on two feet, and then reset. The goal is to work toward clean single leg landings with immediate stability and control.
Similar to the medicine ball exercise, lateral bounds are power-based work and should be programmed accordingly. Perform three to five sets of five to six repetitions on each side, ensuring that each bound is performed with maximum explosive intent. If you feel your power output declining significantly, end the set even if you haven’t reached the target repetition number.
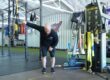
Exercise Three: Supported Single Leg RDL for Glute and Hamstring Strength
The supported single leg Romanian deadlift represents the primary lower body strength exercise in this golf-specific program. While the power exercises develop your ability to generate force quickly, this strength exercise builds the foundational capacity to generate high levels of force in the first place. Your glutes and hamstrings are the primary drivers of hip extension, which occurs explosively during the golf swing as you rotate through impact. Developing significant strength in these muscle groups on a unilateral basis provides multiple benefits for golf performance.
For this exercise, you’ll need either a kettlebell or dumbbell, and you should aim to work with appreciably heavy loads once you’ve mastered the technique. You’ll also need something stable to hold onto for support, such as a squat rack, sturdy table, or specialized suspension trainer. Hold the weight in one hand and stand on the opposite leg. For example, if the weight is in your right hand, you’ll be standing on your left leg. Your support hand holds onto your stable object, which allows you to maintain better balance and torso positioning while working with heavier loads than you could manage in a fully unsupported version of this exercise.
Maintain a tall chest position with your shoulders pulled back and down. The knee of your working leg should have a slight bend, not locked straight but not deeply flexed either. From this starting position, allow your right leg to float off the ground slightly as you begin to push your left hip backward toward the wall behind you. Keep your chest tall and proud throughout the entire movement, avoiding the common mistake of rounding your lower back as you descend. The goal is to feel a substantial stretch developing across your left glute and hamstring as you push your hip back and allow your torso to hinge forward.
The deepest position of the movement is determined by how far you can push your hip back while maintaining a neutral spine position and feeling a quality stretch in your posterior chain. For some golfers, this might mean the weight descends to mid-shin level, while others with different proportions or mobility may stop higher. The descent phase should be controlled, taking approximately two to three seconds, then powerfully drive through your glute and hamstring to pull yourself back to the starting position. The emphasis on the concentric or lifting phase should be explosive intent, even though the actual speed of movement will be relatively moderate due to the heavy load.
The unilateral nature of this exercise serves multiple purposes for golfers. First, it allows you to identify and address any strength imbalances between your lead and trail sides, which are common in golfers due to the asymmetrical nature of the sport. Second, performing the exercise on one leg creates a greater demand for hip stability and balance, which translates well to the dynamic balance requirements during the golf swing. Third, the single leg stance often allows for a deeper, more effective stretch of the posterior hip capsule, which can help maintain or improve hip mobility alongside strength development.
From a loading perspective, don’t be afraid to push the weight on these exercises once your technique is solid. The best golfers in the world can perform single leg RDLs with weights ranging from 60 to 80 pounds or more per side. This isn’t to say you need to immediately work toward these numbers, but it illustrates that this exercise can and should be loaded significantly heavier than the light weights many golfers initially assume are appropriate. Programming recommendations call for three to four sets of six to ten repetitions per side, with the goal of progressive overload over time by gradually increasing the weight while maintaining perfect technique.
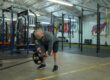
Exercise Four: Kettlebell Swings for Explosive Hip Extension
The kettlebell swing is often called the king of hip extension exercises, and for good reason. This movement trains the violent, explosive hip extension pattern that directly translates to the powerful hip drive needed in the golf downswing. While you can perform a version of this exercise with a dumbbell held by the weighted ends if necessary, a kettlebell is the ideal implement due to its unique shape and weight distribution.
Grip the kettlebell by its horns, which are the sides of the handle, using both hands. Position your feet slightly wider than hip width with the kettlebell held at approximately groin level. To initiate the movement, hike the kettlebell back between your legs like a football center snapping the ball, allowing your hips to push back as the kettlebell travels behind you. This loading phase should create significant tension and stretch across your glutes and hamstrings. From this loaded position, explosively drive your hips forward, using that hip power to propel the kettlebell forward and upward.
A critical distinction must be made here regarding proper technique. The kettlebell should float upward due to the force generated by your hip extension, not because you’re lifting it with your shoulders and arms. Your upper body serves primarily as a connection point that transfers the power generated by your hips into the kettlebell. If you find yourself actively raising the kettlebell with your shoulders, you’re missing the point of the exercise and reducing its effectiveness for golf performance. Even if this means using a lighter kettlebell initially, you should feel that the weight is genuinely floating up to chest or belly button level purely from the force of your hip drive.
The eccentric or lowering phase of each swing is equally important to the concentric phase. As the kettlebell descends, actively pull it back down and between your legs while simultaneously pushing your hips back. This creates what’s called the stretch-shortening cycle, where you rapidly load and stretch your glutes and hamstrings before immediately reversing into the explosive hip extension. This stretch-shortening cycle is identical to what occurs in your golf swing as you transition from backswing to downswing, making the kettlebell swing tremendously valuable for golf-specific power development.
Unlike the strict power exercises where we keep repetitions very low, kettlebell swings can be performed for slightly higher rep ranges while still maintaining explosive intent. Program these for two to four sets of ten to fifteen swings, performed after your main strength work. Every single repetition should still be explosive and powerful. If you find yourself slowing down significantly or losing the crisp, ballistic quality of the movement, end the set even if you haven’t reached fifteen repetitions.
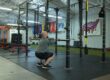
Exercise Five: Pallof Press for Anti-Rotational Core Strength
The final exercise in this golf-specific program is the Pallof press, which despite receiving criticism from some fitness circles, remains an incredibly valuable exercise for developing the anti-rotational core strength essential for golf performance. You can perform this exercise using either a resistance band anchored to a stable object or a cable machine set at chest height. Both options work equally well, so choose based on your available equipment.
Attach the band to a sturdy anchor point and use the band itself as your handle, or grab the handle of a cable machine. Step away from the anchor point until you feel appropriate tension in the band or cable, then assume an athletic stance with knees slightly bent. You can mirror your actual golf stance if you prefer, though this isn’t strictly necessary. Bring the handle or band to the midline of your chest with your elbows bent.
From this starting position, press your hands directly forward away from your chest, extending your arms fully while resisting the band’s attempt to rotate your torso back toward the anchor point. Hold this extended position for a quality one to two second count, maintaining rigid tension through your entire midsection, then return the handle back to your chest with control. The challenge comes from maintaining perfect torso alignment while the offset resistance tries to rotate you. Your abdominal wall, obliques, and deeper core muscles must work together to resist this rotational force.
The importance of anti-rotational strength for golf performance cannot be overstated. While much attention gets paid to rotational power development, the ability to resist unwanted rotation is equally critical. During your golf swing, you need to maintain a stable, rigid connection between your upper and lower body while they rotate at different rates and in different planes. This is what creates the separation or X-factor that generates elastic energy. If your core lacks the strength to maintain this rigid connection, energy leaks occur, club head speed decreases, and consistency suffers.
For golfers who have mastered the basic Pallof press and want to increase the challenge, you can add a rotational component to the exercise. Grip the band with both hands in an overhand position, press out to full extension as normal, but then rotate your arms and hands horizontally while maintaining the extended arm position. Notice that this rotation occurs at your shoulders and arms, not through twisting your torso. You’re still resisting the band’s attempt to rotate your trunk, but you’re adding an additional demand by requiring your upper body to rotate while maintaining core stability. This variation can also help maintain or improve thoracic spine mobility, which contributes to your ability to create shoulder turn in the backswing.
Program the Pallof press for two to four sets of eight to twelve repetitions per side. If you’re using the advanced rotational variation, you may need to reduce the resistance slightly to maintain perfect form throughout the full rep range.
Programming Your Golf Strength Training
Understanding how to organize these five exercises into an effective training program is crucial for maximizing your results while respecting your time constraints. Most golfers prefer to minimize time in the gym, which makes efficient program design essential. If you’re using only these five exercises, I recommend training two days per week with at least two days of recovery between sessions.
Your training session should begin with a thorough warmup that prepares your joints and nervous system for the explosive work ahead. Spend approximately ten minutes performing dynamic mobility exercises, light movement preparation, and progressive activation drills. Once warmed up, start your working sets with the rotational medicine ball scoop tosses or slams followed immediately by the lateral bounds. These power exercises should be performed when you’re fresh and your nervous system is primed for maximum output. Rest two to three minutes between sets of these exercises to ensure full recovery and quality repetitions.
After completing your power work, transition to the single leg RDLs. This is your primary strength exercise for the day, so take it seriously and progressively challenge yourself with the load. Rest approximately two minutes between sets to allow for adequate recovery. Following your RDLs, finish the session with a superset pairing of kettlebell swings and Pallof presses. Perform a set of swings, rest thirty to sixty seconds, perform a set of Pallof presses, rest another thirty to sixty seconds, then repeat. This superset approach saves time while still allowing adequate recovery for each movement pattern.
This entire training session, including warmup, should take approximately 30 to 40 minutes when performed efficiently. Certainly you can add additional exercises addressing upper body strength, extra mobility work, stretching protocols, or other corrective drills if time and goals permit. However, if you’re truly in a time crunch and want the absolute highest return on investment for your golf performance, these five exercises deliver exactly that.
Within eight weeks of consistent training with these exercises, most golfers I work with see measurable improvements in their driving distance, typically adding 20 or more yards to their drives. This improvement comes from enhanced rotational power generation, increased hip extension strength and explosiveness, better lateral stability, and improved core control. The combination of these physical qualities translates directly to increased club head speed, which as we established earlier, is the primary determinant of driving distance.
The key to success with this program is consistency and progressive overload. Show up for your two training sessions each week, focus on quality movement execution, and gradually increase the challenge over time through additional weight, greater explosive intent, or increased technical difficulty. Your golf game will thank you for the investment.
Need help improving your golf performance? Contact us to see how we can help you!