Heels Elevated Dumbbell RDL: Perfect Your Hip Hinge Pattern and Build Stronger Glutes
The heels elevated dumbbell Romanian deadlift (RDL) represents a powerful variation of the traditional dumbbell RDL that addresses common movement compensations while enhancing glute and hamstring development. This exercise modification uses a simple but effective setup change that can dramatically improve your hip hinge mechanics and help you feel your posterior chain working like never before.
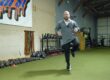
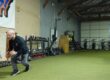
Watch the video below on how to maximize this exercise.
What Is the Heels Elevated Dumbbell RDL?
The heels elevated dumbbell RDL is essentially a traditional dumbbell Romanian deadlift performed with your heels positioned on an elevated surface. This seemingly minor adjustment creates significant biomechanical changes that can improve your movement quality, increase muscle activation, and serve as an excellent teaching tool for proper hip hinge patterns.
Understanding why this variation works requires us to examine how heel elevation affects your body positioning and movement mechanics. When you elevate your heels, you naturally shift your center of mass backward and encourage a more neutral pelvic position, which sets the stage for better movement execution.
Equipment You’ll Need
Setting up for the heels elevated dumbbell RDL requires minimal equipment, making it accessible for most training environments. You’ll need two dumbbells of appropriate weight for your strength level and something to elevate your heels on. The elevation options are quite flexible and include slant boards, weight plates (5-pound, 10-pound, or even 45-pound plates), wedge boards, or any stable platform that allows you to comfortably position just your heels.
The key consideration when selecting your heel elevation is stability and comfort. The surface should be wide enough to accommodate both heels securely while providing enough height to create the desired biomechanical effect without causing balance issues.
Step-by-Step Exercise Execution
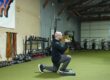
Proper setup begins with positioning your heel elevation device and placing your dumbbells within easy reach. Step onto your chosen elevation with just your heels, allowing your toes and the balls of your feet to remain on the ground. This heel-only positioning is crucial for achieving the intended biomechanical benefits.
Hold your dumbbells with your arms extended naturally at your sides, allowing the weights to rest against the front of your thighs. Your fingernails should be lightly touching your legs, maintaining this connection throughout the movement. Establish a tall chest position with your shoulders back and down, creating a strong upper body foundation.
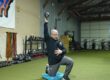
Begin the movement by initiating with your hips, pushing your glutes backward as far as possible while maintaining a flat back position. The key mental cue here is to think about reaching your hips back toward the wall behind you rather than simply bending forward. As you push your hips back, you should feel a significant stretch developing in your glutes and hamstrings.
The descent continues until you reach your maximum range of motion, which will be determined by your flexibility and the point where you can no longer maintain proper spinal alignment. From this stretched position, drive your hips forward to return to the starting position, focusing on using your glutes and hamstrings to power the movement.
The Biomechanical Advantage: Why Heel Elevation Works
The magic of heel elevation lies in its ability to address common movement compensations that plague many athletes and fitness enthusiasts. When your heels are elevated, your pelvis naturally shifts into a more neutral position, counteracting excessive anterior pelvic tilt that often prevents proper hip hinge execution.
This pelvic repositioning brings your center of mass backward, which is particularly beneficial for individuals who tend to be too far forward in their movement patterns. Instead of pushing these athletes even further forward, the heel elevation helps bring them back to a more balanced starting position where they can execute the hip hinge more effectively.
The elevated heel position also encourages you to stay “heel heavy” throughout the movement, meaning your weight remains shifted toward your heels rather than drifting forward onto your toes. This weight distribution is essential for accessing the posterior portion of your hip capsules and achieving a more complete hip hinge pattern.
Additionally, the heel elevation naturally promotes more vertical shin positioning throughout the movement. When your shins remain more vertical, you’re less likely to allow excessive knee bend, which can turn the RDL into more of a squat-like movement and reduce the targeted stress on your glutes and hamstrings.
Muscles Targeted and Benefits
The heels elevated dumbbell RDL primarily targets your posterior chain, with particular emphasis on the glutes and hamstrings. The biomechanical advantages created by heel elevation often result in enhanced activation of these muscle groups compared to traditional floor-based RDLs.
Your glutes work both as hip extensors during the concentric (lifting) phase and as controllers during the eccentric (lowering) phase. The improved hip positioning achieved through heel elevation allows for better glute recruitment and a more complete range of motion at the hip joint.
The hamstrings function primarily as hip extensors in this movement while also working to control knee position. The enhanced hip hinge pattern promoted by heel elevation places the hamstrings in a more advantageous position to contribute to the movement effectively.
Secondary muscles involved include your erector spinae, which work to maintain spinal stability throughout the movement, and your upper back muscles, which help maintain proper posture and dumbbell positioning.
Programming Applications and Variations
The versatility of the heels elevated dumbbell RDL allows it to serve multiple roles in your training program. As a primary strength exercise, you can program it for three to four sets of eight to ten repetitions with challenging weight, focusing heavily on the eccentric (lowering) portion of the movement to maximize muscle building stimulus.
When used as an accessory exercise, consider performing three to four sets of eight to twelve repetitions with moderate weight, emphasizing the stretch and muscle activation rather than maximum load. This approach works particularly well when paired with other compound movements or as part of a posterior chain focused training session.
Perhaps most importantly, this exercise serves as an excellent teaching tool for individuals learning proper hip hinge mechanics. In this application, use very light weight for ten to fifteen repetitions, focusing entirely on movement quality and helping the individual understand how to access their posterior hip position effectively.
Common Mistakes and Coaching Cues
One of the most common errors is allowing the knees to bend excessively during the movement, which shifts the exercise away from a hip hinge pattern and reduces its effectiveness. The elevated heel position actually helps prevent this mistake by making it uncomfortable to bend the knees too much, as doing so would cause you to fall forward off the elevation.
Another frequent issue is losing the connection between the dumbbells and the legs, allowing the weights to drift away from the body. Maintaining light contact between your fingernails and your legs throughout the movement helps ensure proper bar path and optimal muscle activation.
Rushing through the eccentric portion represents a missed opportunity for muscle development and movement quality improvement. Focus on controlling the descent and really feeling the stretch in your glutes and hamstrings before initiating the return to the starting position.
Conclusion
The heels elevated dumbbell RDL offers a simple yet effective modification to the traditional Romanian deadlift that can enhance movement quality, increase posterior chain activation, and serve as a valuable teaching tool. By understanding the biomechanical principles behind this variation and implementing it appropriately in your training program, you can develop stronger glutes and hamstrings while improving your overall hip hinge mechanics.