Half Kneeling Rack Pec Stretch: Complete Guide to Opening Your Anterior Chain
The half kneeling rack pec stretch represents one of the most effective corrective exercises for addressing the postural compensation patterns that plague desk workers, athletes, and lifters alike. This deceptively simple movement targets the entire anterior chain—from the pectoralis major and minor through the anterior deltoid and down into the hip flexor complex—making it an essential tool for anyone looking to combat the forward shoulder posture and hip tightness that comes from prolonged sitting or excessive pressing movements.
Watch the video below on how to maximize this exercise.
Understanding the Biomechanics Behind the Stretch
What makes the half kneeling rack pec stretch particularly valuable is its ability to address multiple dysfunctional patterns simultaneously. When you spend hours hunched over a computer or consistently emphasize pressing movements in your training without adequate counter-balancing, your chest muscles adaptively shorten, your shoulders round forward, and your anterior hip structures tighten from constant hip flexion. This creates a cascade of compensations that can limit shoulder mobility, reduce thoracic extension, and even impact breathing mechanics.
The half kneeling position itself is biomechanically significant. By placing one knee down and the other leg forward, you create a stable base that allows for controlled anterior chain lengthening without compensatory movement through the lumbar spine. The position naturally encourages proper pelvic positioning and prevents the excessive lumbar extension that many people default to when attempting chest stretches in standing positions.
Equipment Setup and Positioning
While the exercise is called a rack pec stretch, you have flexibility in your equipment choices. A standard power rack provides the ideal setup, offering multiple height options for your arm placement along the vertical uprights. However, a doorframe, wall corner, or any sturdy vertical surface works equally well, making this an accessible exercise whether you’re training in a commercial gym or working out at home.
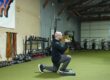
The key to proper positioning starts with your half kneeling stance. Your inside leg—the one closest to the rack or wall—should be down on the ground with your knee positioned directly beneath your hip. Your outside leg comes forward with your foot flat on the floor and your shin vertical. This isn’t a lunge position where your knee tracks far forward; instead, you want that front shin staying relatively upright to maintain stability and prevent compensatory movement.
Your back leg should extend straight behind you rather than angling outward. Many people unconsciously let their down knee rotate away from midline, which reduces the effectiveness of the hip flexor component and can create unwanted stress on the knee joint. Keep that back leg tracking straight, and you’ll feel a significant difference in the quality of the stretch through your hip flexor.
Executing the Stretch with Proper Technique
Once your lower body position is established, focus on your upper body setup. Take the arm on the same side as your down knee and place it against the rack or wall. You can position your contact point anywhere from your fingertips down to your elbow, and adjusting this placement allows you to target slightly different portions of the pectoral complex. Fingertip contact tends to emphasize the upper chest fibers, while elbow contact shifts focus toward the mid and lower pec.
The critical technical element that separates an effective stretch from a wasted effort is rib positioning. Before you lean forward into the stretch, pull your ribcage down toward your pelvis. This posterior tilt prevents you from simply extending through your lumbar spine, which would create the illusion of chest opening without actually lengthening the targeted tissues. Think about pulling your ribs away from your chin rather than pushing your chest forward—this subtle distinction makes an enormous difference in stretch quality.
With your ribs pulled down and controlled, use your front leg to gently pull yourself forward, allowing your body weight to create tension through the pectoral region and anterior shoulder. You should feel the stretch developing across your chest wall, potentially extending into your anterior deltoid and even into the front of your shoulder capsule depending on your specific restrictions.
Enhancing the Stretch Through Rotation and Breathing
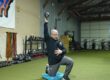
The basic position provides substantial benefit, but you can significantly increase the stretch intensity through strategic rotation. By turning your belly button toward your up leg—rotating away from the stretched side—you introduce a rotational component that increases the tensile load across your chest and even engages your obliques and lateral trunk musculature. This rotation should be controlled and gradual; you’re not trying to twist aggressively but rather allowing your torso to spiral gently away from the fixed arm position.
Breathing mechanics play a crucial role in maximizing this exercise’s effectiveness. Focus on deep nasal inhales followed by complete mouth exhales, and with each exhale, consciously pull your ribs down further while subtly increasing your forward lean or rotation. This breath-focused approach taps into the relationship between respiratory mechanics and postural control, using your exhale to facilitate greater parasympathetic nervous system activation and subsequent tissue relaxation.
Each inhale should expand your ribcage three-dimensionally—not just lifting your chest but also expanding laterally and posteriorly. Each exhale should feel like your ribcage is settling down and back, creating space for increased range of motion as you lean further into the stretch.
Programming Strategies and Implementation
The half kneeling rack pec stretch offers remarkable versatility in how you can integrate it into your training structure. For time-based implementation, holding each side for twenty to thirty seconds provides a straightforward approach that works well as part of a general mobility routine or warm-up sequence. This duration allows sufficient time for tissue adaptation without creating excessive fatigue or requiring extended time commitment.
Alternatively, you can approach the exercise through a breath-focused protocol, performing three to five complete breath cycles per side. This method naturally encourages the connection between breathing mechanics and tissue lengthening while providing a more mindful, focused approach to the movement. Count your breaths rather than seconds, ensuring each exhale facilitates slightly deeper positioning.
For those looking to create more active mobilization, you can incorporate gentle pulses or waves into the stretch. After establishing your position and completing a breath, lean slightly deeper into the stretch before relaxing back a few degrees. This oscillation between deeper and slightly lighter tension can help improve tissue compliance and may feel more productive for some individuals compared to static holding.
The exercise pairs exceptionally well with upper body pressing movements as a superset or interset filler. After completing a set of bench press, overhead press, or dips, immediately transition into the half kneeling rack pec stretch while you’re resting before your next working set. This approach maximizes your gym time efficiency while actively addressing the very tissues you’re repeatedly shortening through your pressing movements.
You can also program this stretch as part of dedicated mobility days, active recovery sessions, or as a cool-down movement at the end of upper body training. The low intensity and non-fatiguing nature make it appropriate for virtually any training context where improving anterior chain mobility serves your goals.
Addressing Common Compensations and Mistakes
Watch for the tendency to extend through your lumbar spine rather than genuinely opening through your chest and shoulders. If you feel the stretch primarily in your low back or you notice your ribcage flaring upward, you’ve lost proper positioning and need to re-establish that rib-down posture before continuing. The stretch should create sensation across your chest wall, front of your shoulder, and down into your hip flexor—not through your spine.
Maintaining that straight back leg position requires consistent attention. As you lean forward and rotate, your body will want to let that down knee rotate outward for stability. Resist this compensation by actively thinking about keeping your back hip pointed straight toward the ground and your knee tracking directly behind you. This maintains the hip flexor lengthening component that makes the half kneeling position so valuable.
The half kneeling rack pec stretch addresses the postural dysfunction epidemic created by our increasingly sedentary society while providing a practical solution that requires minimal equipment and time investment. By consistently implementing this movement, you create lasting improvements in shoulder positioning, breathing mechanics, and movement quality that transfer directly to both athletic performance and daily life function.