10 Essential Resistance Band Exercises Every Athlete Should Master
Resistance bands represent one of the most underutilized yet effective training tools in athletic development. While traditional weights dominate most strength and conditioning programs, bands offer unique biomechanical advantages that make them indispensable for developing explosive power, improving movement quality, and building resilient athletes. The portability and versatility of band training allow athletes to maintain high-quality training sessions regardless of equipment availability, while the accommodating resistance profile creates training stimuli that free weights simply cannot replicate.
The fundamental advantage of resistance band training lies in how the tension changes throughout a movement’s range of motion. Unlike barbell or dumbbell exercises where the resistance remains constant, bands provide variable resistance that increases as they stretch. This accommodating resistance matches natural strength curves more effectively in many movements, allows for safer explosive training with reduced eccentric loading, and creates unique overspeed eccentric contractions that enhance the stretch-shortening cycle. For athletes focused on speed, power, and movement quality, these characteristics make resistance bands an essential component of comprehensive athletic development programs.
The ten exercises outlined here cover the complete spectrum of athletic performance needs. From lower body explosiveness and acceleration mechanics to upper body power development and core stability, this collection addresses every major movement pattern athletes need to train. Whether you’re a beginner learning fundamental movement patterns, an intermediate athlete building your physical foundation, or an advanced competitor seeking specific performance enhancements, these band exercises provide scalable progressions that deliver results at every level. The best part is that you can implement all of these exercises with just a basic set of resistance bands and minimal additional equipment, making this an accessible approach for athletes training in any environment.
You can also watch the video below that goes along with this article.
Building Explosive Lower Body Power with Band Assisted Vertical Jumps
The band assisted vertical jump stands as one of the most effective tools for developing maximal lower body power output while simultaneously preparing the neuromuscular system for high-intensity plyometric demands. This exercise creates a unique training environment where athletes can experience supramaximal jump heights, meaning they’re jumping higher than their unassisted capabilities allow. This supramaximal exposure has profound effects on both the neuromuscular system and the connective tissue structures that support explosive movement.
Setting up the band assisted vertical jump requires a sturdy overhead anchor point such as a pull-up bar or squat rack crossbar. Loop a thick resistance band around this anchor point and pull one end through the other to create a choke hold that secures the band. The amount of assistance you receive depends on how high you grip the band, with higher grips providing more support and lower grips offering less assistance. This adjustability makes the exercise infinitely scalable, allowing beginners to experience proper jump mechanics while giving advanced athletes a tool for contrast training and overspeed work.
The execution emphasizes maximal effort on every single repetition. Starting from a standing position with the band gripped at the appropriate height, athletes perform a countermovement by dropping into a quarter to half squat position before exploding upward with maximum force. The band assistance allows athletes to achieve greater peak heights than they could reach independently, which exposes the nervous system to movement velocities and force outputs beyond normal capabilities. This supramaximal training effect creates adaptations in motor unit recruitment patterns and rate coding that transfer directly to unassisted jumping performance.
From a tissue preparation perspective, the band assisted vertical jump provides crucial benefits for tendon and ligament conditioning. The Achilles tendon, patellar tendon, and other connective tissue structures around the ankle, knee, and hip must be progressively loaded to handle the extreme forces generated during maximal effort jumps. By allowing athletes to experience these high forces with some degree of assistance, the exercise creates an ideal stimulus for building resilient tendons without the excessive eccentric landing forces that can lead to overuse injuries in traditional plyometric training.
The programming approach for band assisted vertical jumps should treat this as a maximum effort power development exercise rather than a conditioning drill. Three to five sets of three to five repetitions provides sufficient volume to drive adaptation without creating excessive fatigue that degrades movement quality. Rest periods between sets should be substantial, typically two to three minutes, allowing for complete phosphocreatine replenishment and nervous system recovery. This exercise pairs exceptionally well in contrast training protocols, where athletes perform a heavy strength exercise like back squats or trap bar deadlifts followed immediately by band assisted jumps to potentiate maximal power output.
Developing Explosive Acceleration with Band Resisted Sprint Starts
Linear speed development requires dedicated training of the acceleration phase, where athletes generate the horizontal forces that propel them from a static position into full sprint velocity. Band resisted acceleration sprints create an overload environment that strengthens the specific muscle actions, joint angles, and movement patterns required for explosive starts. This exercise targets the first three to five yards of sprint acceleration, the critical distance where most athletic movements occur and where games are often won or lost.
The setup for band resisted acceleration requires connecting two light resistance bands together to create adequate length for the exercise. This longer band setup allows for progressive resistance as the athlete accelerates forward while maintaining enough slack to avoid jerking the athlete backward prematurely. Anchor the connected bands to a sturdy fixed object at approximately waist height, then create a belt loop with the free end that you’ll wear around your hips. The resistance should be substantial enough to challenge your acceleration but not so heavy that it completely alters your sprint mechanics.
Proper starting position mirrors the athletic stance used in acceleration-focused speed training. Athletes should position themselves far enough from the anchor point to create initial band tension, then assume a forward lean with the lead leg positioned underneath the hips and the drive leg loaded behind the body. The arm position should reflect sprint mechanics, with the opposite arm forward to the lead leg. This starting position ensures that the first explosive step can immediately translate into horizontal force production rather than wasting movement on postural adjustments.
The execution focuses entirely on rate of force development during those critical first steps. As the athlete explodes forward against the band resistance, the overload forces them to maximize ground contact force and maintain proper forward lean throughout the acceleration phase. The band resistance prevents athletes from standing upright too quickly, one of the most common technical faults in acceleration mechanics. Instead, the resistance naturally reinforces the low body position and forward shin angles that characterize efficient acceleration technique.
Programming band resisted acceleration sprints requires treating them as maximum effort speed work rather than conditioning. This exercise should appear at the very beginning of training sessions when the nervous system is fresh and athletes can produce maximum effort on every repetition. Working distances should remain short, typically three to five yards, with complete recovery between sprints. Two to three repetitions per set allows for maximum quality, while rest periods of two to three minutes ensure each sprint receives full effort. Advanced training setups can involve a coach or partner holding the band and walking forward with the athlete, allowing for slightly longer acceleration distances up to ten yards while maintaining appropriate resistance throughout the movement.
Strengthening Hip Stability and Movement Quality with Monster Walks
Monster walks with a mini resistance band address a critical component of athletic performance that often receives insufficient attention in traditional strength training programs. Hip stability and the ability to maintain proper lower extremity alignment during dynamic movements directly impacts injury risk, movement efficiency, and force transfer throughout the kinetic chain. While this exercise won’t necessarily make you stronger in the traditional sense of maximal force production, it develops the muscular endurance and motor control in the hip abductors and external rotators that keep your knees, hips, and lower back healthy under the repetitive demands of athletic training.
The exercise requires only a small mini band placed around both legs. Band placement significantly affects the resistance profile and training emphasis. Positioning the band just above the knees creates moderate resistance that most athletes can handle while learning proper movement patterns. Moving the band below the knees increases the resistance lever arm and creates substantially more challenge for the hip stabilizers. Some athletes also experiment with ankle placement, though this creates the highest resistance and should be reserved for advanced practitioners with well-developed hip stability.
Execution begins with establishing an athletic base position similar to a defensive stance in basketball or a ready position in tennis. Feet should be positioned wider than hip width, chest tall, and hips slightly lowered while maintaining a neutral spine. The key technical focus is maintaining whole-foot contact with the ground rather than allowing the arches to collapse or shifting weight excessively to the outside edges of the feet. As you step in any direction, the standing leg must resist the band’s pull that tries to collapse the knee inward, forcing the hip abductors and external rotators to work isometrically while the stepping leg moves dynamically.
Movement variations make monster walks adaptable for different training needs and provide comprehensive hip stability development. Forward walking emphasizes the gluteus medius and anterior hip capsule structures while challenging single leg balance. Backward walking shifts more emphasis to the posterior hip musculature and requires greater proprioceptive awareness. Lateral shuffles create the most direct challenge to the hip abductors and most closely mirror the lateral movement demands of court sports and change of direction activities. Diagonal walking patterns combine these benefits while adding complexity that improves overall movement coordination.
The monster walk serves different purposes depending on athlete development level. Beginner athletes benefit from monster walks as a primary hip strengthening exercise that teaches proper foot positioning, external rotation activation, and knee alignment during movement. These foundational movement qualities transfer directly to landing mechanics, deceleration technique, and change of direction ability. Advanced athletes use monster walks primarily as a warm-up tool that activates the hip stabilizers before higher-intensity speed, power, or strength training. The muscular activation and proprioceptive awareness developed during monster walk warm-ups carries over into subsequent training, improving movement quality and potentially reducing injury risk during demanding training sessions.
Programming monster walks typically involves distance-based sets rather than repetition counting. Walking ten to twenty yards in each direction provides sufficient volume to achieve the activation and stability benefits without creating excessive fatigue. The exercise can be performed as part of a comprehensive dynamic warm-up, inserted between strength training sets as active recovery, or completed before athletic practice sessions to prepare the hips for sport-specific demands.
Teaching Hip Hinge Mechanics with the Band Pull Through
The hip hinge represents one of the most fundamental movement patterns for athletic performance, forming the biomechanical foundation for jumping, sprinting, landing, and nearly every powerful lower body movement. Despite its importance, many athletes struggle to properly load the posterior chain during hip hinging, instead relying on excessive knee bend or spinal flexion that reduces power output and increases injury risk. The band pull through provides a unique teaching tool that literally pulls athletes into proper hip hinge position while simultaneously building strength in the glutes and hamstrings.
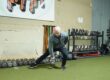
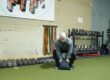
Setting up the band pull through requires anchoring a long resistance band of moderate to heavy tension around a low fixed point on a rack or similar sturdy object. Loop the band through itself to create a secure choke hold, positioning the anchor point approximately six to twelve inches off the ground. Step over the band so it runs between your legs, then grip the band with both hands and walk forward until you feel moderate tension. Your feet should be positioned slightly wider than hip width with toes pointing forward or slightly outward, creating a stable base for the hip hinge movement.
The movement execution emphasizes allowing the band to pull you backward into hip flexion rather than actively squatting down or bending forward from the spine. Start with a tall chest, neutral spine, and soft knees. As you allow the band to pull your hands and hips backward, you should feel tension building in the hamstrings as they lengthen eccentrically. The hips travel backward and down while the torso inclines forward, but the spine maintains its neutral position throughout the movement. This backward pull from the band teaches athletes to access the posterior aspect of the hip capsule and load the glutes and hamstrings properly, motor patterns that many athletes struggle to develop with traditional teaching cues alone.
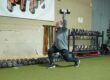
The concentric portion of the movement reinforces proper hip extension mechanics for athletic performance. Drive through the entire foot, with particular attention to maintaining heel contact throughout the movement. The glutes and hamstrings contract powerfully to extend the hips and return to the starting position. At the top of the movement, focus on achieving a strong glute contraction and full hip extension without overextending the lumbar spine. This finish position mirrors the triple extension position seen in jumping and sprinting, making the movement pattern highly transferable to athletic performance.
For beginning and intermediate athletes, the band pull through serves primarily as a teaching tool and foundational strength builder. These athletes should focus on mastering the hip hinge pattern with lighter resistance, performing ten to fifteen repetitions for two to three sets while concentrating on technique quality. The feedback from the band pulling backward makes it easier for athletes to understand what proper hip hinging should feel like compared to verbal coaching cues alone. Advanced athletes can use the band pull through as a high-repetition finisher exercise, performing fifteen to twenty-five repetitions to accumulate volume for glute and hamstring development without the spinal loading that comes with heavy barbell variations.
Developing Pull-Up Strength with Band Assisted Pull-Ups and Chin-Ups
Pull-ups and chin-ups represent essential upper body strength markers for athletes, developing the vertical pulling strength necessary for grappling sports, climbing movements, and overall upper body development. However, many athletes, particularly those new to structured strength training, lack the relative strength necessary to perform even a single quality repetition. Band assisted pull-ups provide a systematic progression that allows athletes to train the exact movement pattern while receiving assistance through the most challenging portion of the range of motion.
The most effective setup for band assisted pull-ups involves using a squat rack with adjustable J-hooks or spotter arms rather than simply looping the band over the pull-up bar. Position two J-hooks at a height that allows moderate band stretch when your feet rest on the band in the bottom position. Loop one end of a long resistance band over each J-hook, creating a stable platform for your feet. This setup provides two major advantages over the traditional loop method. First, it allows for progressive overload by adjusting both the band tension and the J-hook height independently. Second, it creates a more stable assistance platform that doesn’t shift or twist during the movement.
Execution begins with gripping the pull-up bar with your preferred hand position. Pull-ups use a pronated grip with palms facing away, while chin-ups employ a supinated grip with palms facing toward you. Both variations develop upper body pulling strength with slightly different emphasis patterns. Carefully place both feet on the band with enough space between them to maintain stability throughout the movement. Lower yourself to a full hang position with arms completely straight and shoulders engaged. From this bottom position, pull yourself upward until your chin clears the bar, focusing on driving the elbows down and back rather than simply pulling with the arms.
The band assistance provides maximum support at the bottom of the movement where most athletes struggle and gradually decreases as you pull yourself higher. This matches the natural strength curve of the pull-up movement, where the bottom position presents the greatest mechanical disadvantage. As athletes get stronger, they can progress by either using lighter resistance bands or by lowering the J-hook position to reduce the amount of assistance provided. This systematic progression provides clear markers of improvement that help maintain motivation during the sometimes lengthy process of building unassisted pull-up strength.
Programming approaches for band assisted pull-ups vary based on training goals and current strength levels. Athletes working to develop their first unassisted pull-up should focus on accumulating quality repetitions in the three to eight repetition range across three to four sets. This approach builds both the muscular strength and the motor pattern proficiency needed for successful unassisted pull-ups. Use enough band assistance to complete all prescribed repetitions with good technique, then systematically reduce assistance as strength improves. Advanced athletes who can already perform multiple unassisted pull-ups can use light band assistance for explosive pull-up training, focusing on maximum speed and power output for three to five sets of three to five repetitions with extended rest periods between sets.
Building Shoulder Health and Upper Back Strength with Band Face Pulls
Face pulls address a critical balance in upper body development that impacts both performance and injury prevention. Modern training culture often emphasizes pressing movements like bench press and overhead press while neglecting the posterior shoulder and upper back musculature that provides scapular stability and balanced shoulder function. This imbalance contributes to shoulder impingement issues, poor posture, and reduced pressing strength. The band face pull directly targets the rear deltoids, middle trapezius, rhomboids, and external rotators that maintain healthy shoulder mechanics under demanding training loads.
Setup requires anchoring a long resistance band of light to moderate tension at approximately face height. Loop the band through itself around a squat rack upright or similar fixed anchor point. Step back from the anchor until you feel appropriate tension with arms extended forward. The starting position should include feet in a staggered stance for stability, core engaged, and arms extended forward with palms facing down. This initial position pre-stretches the posterior shoulder muscles and upper back, creating a clear end range that athletes will pull from.
The pulling motion emphasizes external rotation and scapular retraction rather than simple elbow flexion. As you pull the band toward your face, focus on driving the elbows up and back while actively pulling the band apart. This spreading action engages the external rotators and ensures proper shoulder positioning throughout the movement. The band should finish near your chin or upper neck level with elbows higher than the hands and a strong contraction felt in the upper back and rear shoulders. The eccentric lowering phase should be controlled, maintaining tension throughout the movement rather than simply allowing the arms to snap forward.
Common technical faults include overextending through the lumbar spine to complete the pulling motion or allowing the elbows to drop below hand level during the pull. Maintain rib position by keeping the core engaged and avoiding excessive spinal extension. The pulling motion should come purely from the shoulders and upper back without compensatory movement through the trunk. If you find yourself needing to lean back or extend the spine to complete repetitions, reduce the band tension to allow for proper movement quality.
The versatility of face pulls allows them to serve multiple purposes within comprehensive training programs. As a warm-up exercise before pressing sessions, two to three sets of fifteen to twenty repetitions activate the posterior shoulder structures and improve scapular positioning for safer, more effective pressing. When superset with pressing exercises like bench press or overhead press, face pulls provide active recovery between pressing sets while accumulating volume for the often under-trained pulling musculature. As a high-repetition finisher at the end of upper body training sessions, three to five sets of fifteen to twenty-five repetitions create a significant hypertrophic stimulus for upper back development while promoting shoulder health through increased blood flow and muscular endurance in the stabilizing structures.
Progressing Push-Up Strength with Band Assisted Push-Ups
Push-ups represent a fundamental upper body pressing movement that develops strength in the chest, shoulders, and triceps while requiring significant core stability. Despite being a bodyweight exercise, many beginner athletes and younger trainees lack the relative strength to perform quality push-ups with proper technique. Band assisted push-ups provide the same systematic progression benefits as band assisted pull-ups, allowing athletes to train the exact movement pattern while receiving assistance that ensures proper form and adequate training volume.
The preferred setup mirrors the band assisted pull-up approach using adjustable J-hooks on a squat rack. Position the J-hooks at approximately hip height and loop a long resistance band of light to moderate tension over both hooks. The exact height will depend on individual proportions and the amount of assistance needed, making adjustability crucial for optimal programming. The band should provide enough assistance to maintain proper push-up mechanics throughout the set while still requiring significant effort from the athlete.
Position yourself in a standard push-up stance with the band draped across your hips or lower abdomen. Hands should be placed slightly wider than shoulder width with fingers pointing forward. Create a rigid plank position from head to heels, engaging the core to prevent sagging through the hips or piking up at the waist. Lower yourself under control until your chest nearly touches the ground, maintaining elbow position at approximately forty-five degrees from your torso. The band assistance will support a portion of your bodyweight throughout the movement, making the pressing action more manageable while preserving proper movement mechanics.
For beginning athletes and youth populations, the band assisted push-up serves as a primary upper body strength builder and motor pattern teaching tool. Program the exercise in the five to twelve repetition range, using enough band assistance to achieve this target with good technique. As strength improves, progress by either using lighter bands or lowering the J-hook height to reduce assistance. This systematic progression provides clear training benchmarks and helps maintain motivation as athletes work toward unassisted push-up proficiency.
Advanced athletes can transform the band assisted push-up into an explosive power development exercise. Using light to moderate band assistance, focus on pushing away from the ground as explosively as possible, generating enough force that the hands leave the ground at the top of each repetition. This plyometric variation trains the stretch-shortening cycle in the pressing musculature and develops upper body power that transfers to sports like basketball, volleyball, and combat sports that require explosive arm actions. Program explosive band assisted push-ups for three to five sets of five to six repetitions with the same rest intervals used for other power exercises, typically one to two minutes between sets.
Enhancing Core Stability with Dead Bug Band Pullovers
Core stability training has evolved beyond simple exercises like planks and sit-ups to include more sophisticated approaches that integrate multiple muscle groups while maintaining challenging positions. The dead bug with band pullover combines trunk stability demands with active shoulder movement, creating a comprehensive exercise that develops both local core stabilizers and global movement coordination. This integration reflects how the core actually functions during athletic performance, stabilizing the trunk while the extremities move dynamically.
Setup requires anchoring a light to moderate resistance band at approximately hip height on a rack or fixed object. Loop the band through itself to create a secure choke hold, then position yourself lying supine on the ground with adequate distance from the anchor point to maintain band tension throughout the exercise. The precise distance will vary based on band strength and individual arm length, but you should feel continuous tension even with arms overhead holding the band.
The starting position establishes the dead bug posture that forms the foundation of the exercise. Lie flat on your back with the band held in both hands above your chest. Lift your feet off the ground and bend both hips and knees to ninety degrees, creating an L-shape at each joint. Press your lower back gently into the ground, eliminating excessive lumbar lordosis and creating a neutral pelvic position. This starting posture requires core activation to maintain even before adding the movement components.
The movement combines a straight-arm pullover motion with contralateral leg extension. Pull the band overhead in an arcing motion similar to a straight-arm lat pulldown while simultaneously extending one leg until it’s nearly parallel to the ground. The key technical challenge is maintaining the neutral spine and pelvic position throughout this coordinated movement. As the band creates an extension force trying to pull your arms overhead and the leg extension creates a lever that wants to tilt the pelvis, your core musculature must work intensely to maintain stability.
The biomechanical integration of this exercise provides unique benefits for athletic core development. As you perform the pullover motion, your latissimus dorsi contracts to pull the band downward. The lats attach to the thoracolumbar fascia and pelvis, creating a direct connection between shoulder movement and pelvic position. This anatomical relationship means that proper lat engagement during the pullover actually helps stabilize the pelvis and maintain the neutral spine position required for effective dead bug execution. Athletes learn to integrate shoulder movement with core stability, a pattern that directly transfers to throwing, swinging, and overhead athletic movements.
Programming the dead bug with band pullover should emphasize quality over quantity, focusing on maintaining perfect trunk position throughout every repetition. Two to four sets of six to ten repetitions per leg provides sufficient volume to develop the neuromuscular coordination and muscular endurance required for effective core stability. The resistance should be light enough to maintain proper form but heavy enough that you clearly feel your core working to prevent compensatory movement. Athletes who can maintain perfect position with light resistance can progress by using heavier bands or by extending the leg further from the body to increase the stability challenge.
Maximizing Posterior Chain Power with Band Resisted Kettlebell Swings
The kettlebell swing has earned its place as one of the most effective exercises for developing explosive hip extension and posterior chain power. The ballistic nature of the swing trains the rapid force production and stretch-shortening cycle performance crucial for sprinting, jumping, and change of direction. Adding band resistance to kettlebell swings creates an enhanced training stimulus that challenges the movement in unique ways unavailable with traditional weight alone.
Setup requires securing a long resistance band of moderate to heavy tension to a kettlebell handle. Loop the band through the kettlebell and then back through itself to create a secure attachment that won’t slip during explosive swinging. Stand on the band with both feet in a wide athletic stance, positioning your feet to create appropriate initial tension. Even holding the kettlebell at rest between your legs, you should feel the band trying to pull the weight downward. This pre-tension is crucial for creating the overspeed eccentric effect that makes this variation so effective.
The swing execution follows standard kettlebell swing mechanics with particular attention to explosive hip drive. Start with the kettlebell between your legs, hips loaded in a hip hinge position similar to the band pull through. Explosively extend the hips to drive the kettlebell forward and upward, focusing on powerful glute and hamstring contraction rather than arm elevation. The band resistance increases throughout the upward swing phase, forcing you to generate more power to reach the target height. As the kettlebell reaches peak height and begins descending, the band accelerates the downward motion faster than gravity alone would, creating an overspeed eccentric phase.
This overspeed eccentric represents the key training benefit of band resisted kettlebell swings. As the band pulls the kettlebell downward more aggressively than normal, your posterior chain must decelerate this increased load eccentrically before explosively reversing the motion into the next repetition. This enhanced stretch-shortening cycle creates greater elastic energy storage in the tendons and fascia, develops more powerful concentric hip extension, and improves rate of force development in the glutes and hamstrings. These adaptations transfer directly to sprinting acceleration and maximum velocity mechanics where rapid eccentric deceleration and explosive concentric propulsion determine speed performance.
Programming band resisted kettlebell swings depends on your specific training goals and periodization phase. For power endurance development, perform six to twelve repetitions per set, using a moderate weight kettlebell and band resistance that allows for sustained explosive effort throughout the entire set. This approach develops the ability to repeatedly generate explosive hip extension, an essential quality for sports with extended playing times. For maximum power development, reduce the repetition range to five or six per set while using a heavier kettlebell or stronger band resistance. This lower repetition approach emphasizes peak power output on each repetition rather than sustained power production.
Athletes with limited kettlebell weight options find particular value in this variation. If your available kettlebells feel too light for effective strength or power training, adding band resistance increases the challenge substantially without requiring additional equipment purchases. The variable resistance profile also makes band resisted swings valuable for conditioning work, allowing you to accumulate significant posterior chain training volume while the changing resistance throughout each repetition creates a more comprehensive muscular stimulus.
Developing Rotational Core Stability with Pallof Press Variations
The Pallof press family of exercises addresses rotational core stability, a critical but often neglected component of athletic core development. While many core exercises focus on flexion and extension movements like crunches or back extensions, athletic performance frequently demands resistance to rotation as external forces try to twist the trunk. The Pallof press and its variations train the core musculature to resist these rotational forces, improving performance in sports ranging from baseball and golf to football and martial arts.
The basic Pallof press setup requires anchoring a resistance band of light to moderate tension at approximately chest height. Stand perpendicular to the anchor point in an athletic stance with feet slightly wider than hip width. Interlock your hands around the band and create initial tension by positioning yourself at an appropriate distance from the anchor. The band should pull your hands toward the anchor point, creating a rotational force that tries to twist your torso. Your core musculature must resist this rotation to maintain a stable, forward-facing trunk position.
The press motion adds a dynamic challenge to this anti-rotation stability requirement. From the starting position with hands at chest level, press your hands straight forward until arms reach full extension. Hold this extended position briefly while maintaining perfect trunk alignment and resisting the band’s rotational pull. Return the hands to chest position under control and repeat. The extended arm position increases the moment arm and therefore the rotational challenge, requiring greater core activation to maintain stability. The key technical focus is keeping the hips and shoulders square throughout the entire movement, resisting any twisting or compensatory motion through the trunk.
Stance variations allow for progression and different training emphases within the Pallof press framework. The standard bilateral stance provides the largest base of support and allows athletes to focus purely on core activation patterns. Half-kneeling positions, where one knee contacts the ground while the other foot plants forward, reduce the base of support and increase the stability challenge substantially. This variation also creates different hip positions between the down leg and the up leg, challenging pelvic stability and integration of lower body position with core function. Split stance variations fall between these options, providing moderate stability challenges while maintaining more athletic relevance to standing movement patterns.
Chop and lift variations expand the Pallof press concept into different planes of motion. For chop patterns, anchor the band at a high position and pull downward across the body from high to low, resisting rotation while moving through diagonal patterns. Lift variations reverse this pattern, anchoring the band low and pulling upward from low to high. These diagonal movements more closely mirror many athletic rotational movements while maintaining the anti-rotation training stimulus that makes these exercises so valuable.
Programming Pallof press variations should emphasize isometric holds and controlled movement quality over high repetition volumes. For press variations, ten to fifteen controlled repetitions per side across two to three sets develops appropriate core endurance and motor control. Hold variations can be performed for timed sets, typically twenty to forty seconds of continuous tension while maintaining perfect position. These exercises integrate well into comprehensive training programs as warm-up exercises before rotational power work, as core stability training during the main workout, or as finishing exercises to accumulate core training volume without spinal loading.
Implementing Resistance Band Training for Athletic Development
These ten resistance band exercises provide a comprehensive framework for athletic development across multiple physical qualities and movement patterns. The true power of resistance band training emerges when exercises are strategically programmed based on individual needs, training phases, and performance goals. Beginning athletes benefit from using band exercises as primary strength builders and movement pattern teaching tools, developing the fundamental hip hinge mechanics, pressing patterns, and core stability that form the foundation for more advanced training. Intermediate athletes integrate band work alongside traditional strength training, using bands for explosive power development, accessory work, and movement quality enhancement. Advanced athletes leverage resistance bands for specific applications like contrast training, overspeed work, and maintaining training quality during travel or equipment-limited situations.
The minimal equipment requirements and unlimited scalability make resistance band training accessible for athletes at every level and in virtually any training environment. A comprehensive set of resistance bands spanning light to heavy tensions costs substantially less than traditional weight equipment while providing training options that weights simply cannot replicate. This accessibility removes common barriers to consistent high-quality training, whether you’re a high school athlete training at home, a college competitor maintaining off-season conditioning during breaks, or a professional managing training around a demanding competitive schedule.
Beyond the specific exercises and programming guidelines presented here, the broader principle is that resistance bands deserve serious consideration as a primary training tool rather than simply a supplemental option or warm-up implement. The unique biomechanical properties of variable resistance, the enhanced stretch-shortening cycle training, and the practical advantages of portability and versatility make bands an essential component of comprehensive athletic development programs. Master these ten exercises, understand the programming principles behind their implementation, and consistently apply them within your training to develop the explosive power, movement quality, and resilient physiology that define athletic excellence.
Need help improving your athletic performance, speed, and agility? Contact us to see how we can help you, or check out our remote coaching!