Unsupported Hip Airplane Exercise: Build Hip Mobility and Single-Leg Stability
The unsupported hip airplane is a deceptively simple yet highly effective hip mobility and stability drill that belongs in the warm-up routine of nearly every athlete and lifter. As a progression from the traditional supported hip airplane, this variation removes the external support of a rack or fixed object, forcing your body to generate its own stability while simultaneously working through a full range of hip rotation. The result is an exercise that simultaneously trains hip mobility, single-leg balance, glute activation, and the small stabilizing muscles of the hip complex, all at once, making it one of the most efficient preparation movements you can add to your training day.
Watch the video below on how to maximize this exercise.
Why Remove the Support?
The supported hip airplane is a fantastic starting point, but the moment you take your hand off the rack, the demands on your neuromuscular system increase dramatically. Without that external anchor, your standing leg, foot, ankle, calf, and peroneal muscles must all coordinate to keep you balanced while your hip rotates through its range of motion. This is exactly how your body needs to function in real athletic and training contexts. Squatting, deadlifting, sprinting, jumping, and wrestling all require your hip to be mobile and stable at the same time, under load, without anything to hold onto. The unsupported variation bridges that gap between isolated mobility work and functional athletic performance.
Setup and Technique
You need nothing more than a small amount of open floor space to perform this exercise. If possible, performing the unsupported hip airplane barefoot is recommended, as removing your shoes improves foot mechanics and proprioception, allowing sensory feedback from the foot to travel up the kinetic chain and more effectively engage the hip. This is not required, but it is a worthwhile consideration.
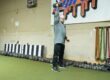
Begin by standing on one leg and placing both hands on your hips. Keeping your hands on your hips throughout the movement serves two purposes: it ensures that you are not using your arms for balance compensation, and it gives you direct tactile feedback on whether your hips are rotating the way they should be. Unlock your standing knee slightly, avoiding a locked-out hyperextended position, and hinge forward at the hip. The depth of your hinge directly controls the difficulty of the exercise. A shallower hinge is more manageable, while a deeper hinge increases the demand on your balance and hip musculature. Start conservatively and add depth as you feel more controlled.
From the hinged position, rotate your trail hip downward and inward, toward your standing foot. You should feel a pronounced stretch and activation through the outer glute and hip external rotators of the standing leg. Hold briefly at end range, then reverse the motion by driving your trail hip upward and open, rotating into hip external rotation. Aim to achieve a little more range of motion with each repetition, working into the hip progressively rather than forcing rotation all at once.
What You Should Feel
When performed correctly, the unsupported hip airplane produces clear and distinct sensory feedback. Your glutes and the deep hip stabilizers should light up almost immediately. Your standing foot, calf, and peroneal muscles will be working hard to maintain your balance against the rotational forces your hip is generating. When you finish a set and return to a standing position, your hip should feel noticeably more mobile and your single-leg stability should feel more solid. That immediate before-and-after difference is one of the reasons this exercise is best used as a preparation movement rather than a standalone strength drill.
Programming and Application
The unsupported hip airplane is most valuable as a dynamic warm-up exercise performed before your primary training session. Use it after a general warm-up to bridge the gap into more specific preparation before getting under the barbell or beginning sport-specific activity. Performing five to ten repetitions per side for one to two sets is typically sufficient to get the hips feeling primed and ready to perform.
If you have one hip that is notably tighter or less stable than the other, add an extra set or two on that side. You can work this in between warm-up sets, on active recovery days, or as part of a mobility-focused session. There is no bad time to include this exercise, but it pays the biggest dividends when placed immediately before activity that demands hip function, such as squatting, deadlifting, running, or any athletic movement pattern.
This exercise is not meant to be rushed. Slow, deliberate rotation through the hip socket with genuine attention to what you are feeling will produce far better results than rapid reps done for the sake of volume. Take your time, own each position, and let your hip show you where it needs work.