Hatfield Squat: How to Do It, Muscles Worked, and Programming Tips
The Hatfield squat is one of the most underrated squat variations in strength training, yet it offers a unique combination of load tolerance, technical feedback, and lower body development that few exercises can match. Whether you’re a powerlifter looking to reinforce your squat mechanics, an athlete building lower body strength, or a general fitness trainee without access to machines, the Hatfield squat deserves a place in your programming.
Watch the video below on how to maximize this exercise.
What Is the Hatfield Squat?
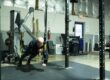
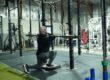
The Hatfield squat — named after legendary strength athlete Dr. Fred Hatfield — is a squat variation performed with a safety squat bar while the lifter uses a fixed object for hand support. That support typically comes from band pegs inside a power rack, a secondary set of J-hooks with a barbell placed on the opposite side of the rack, or any stable attachment point you can comfortably reach during the movement. The key distinction from a standard squat is that your hands are lightly resting on the support — not pulling or pushing — which frees your upper body from the stability demands of a traditional barbell squat and allows you to focus nearly all of your effort on your legs and trunk.
Equipment Setup
To perform the Hatfield squat, you’ll need a safety squat bar and a rack with a fixed holding point. If your rack has band pegs, a simple and clean setup is to position the pegs so they face inward toward each other at a comfortable height — this makes it easy to hold on without interference. If your rack doesn’t have band pegs, place a standard barbell on the opposite side of the rack using a second set of J-hooks. Either option gives you a stable reference point to lightly brace against throughout the movement.
How to Perform the Hatfield Squat
Get underneath the safety squat bar and position it securely on your upper traps. From the start, you can lightly hold the band pegs or the safety squat bar handles — both are acceptable. Unrack the bar and walk out to your normal squat stance.
From here, the movement itself mirrors your standard squat pattern. Keep your chest tall, your rib cage stacked over your pelvis, and initiate the descent by breaking at the hips. Allow your knees to travel slightly forward and out as you descend to approximately 90 degrees of knee flexion. Drive back up through the floor to return to the starting position, maintaining trunk engagement and bar balance throughout.
Because the safety squat bar has a naturally forward-pulling camber, you’ll need to actively fight to keep your chest up. Overarching is equally problematic — it can throw the bar off your back entirely. The goal is neutral positioning: chest up, core braced, and a stacked spine from thoracic extension through the pelvis.
The Most Common Mistake
The single biggest error people make with the Hatfield squat is using the support for active assistance — actually pulling or pushing against the pegs or bar to help themselves out of the bottom. The support should serve only as a light balance reference, nothing more. A simple fix: rather than gripping the support tightly, simply rest your open hands against it. This prevents you from accidentally muscling yourself up with your arms and keeps the training stress exactly where it belongs — on your legs.
Muscles Worked
The Hatfield squat is a lower body dominant movement that emphasizes the quadriceps, glutes, and hamstrings similarly to a standard squat. Because the safety squat bar naturally challenges the lifter to maintain thoracic extension and upper back engagement, the upper back — specifically the traps and erectors — is also working to keep the bar in position. Removing the bilateral stability demand (because your hands are supported) actually increases the demand on your trunk to keep the pelvis and rib cage aligned, making this an effective movement for developing positional strength in the squat pattern.
Programming the Hatfield Squat
The Hatfield squat is most commonly used as a supplemental exercise to build squat and deadlift strength, particularly from a positional and upper back standpoint. In this role, two to four sets of five to ten repetitions works well for most trainees. It can, however, be programmed in multiple ways depending on your goals:
As a supplemental movement, it reinforces the upper back positioning demands of the squat while allowing you to use more load than you otherwise might because stability is partially offloaded. As a primary movement, you can work up to harder sets in the two to three rep range. And if you’re chasing a serious lower body pump at the end of a session, high-rep sets in the fifteen to twenty-plus range are entirely appropriate.
The Hatfield squat also functions as an excellent equipment substitute. If you don’t have access to a leg press or belt squat, this movement gives you a way to approximate that machine-based, low-fatigue lower body training stimulus while still doing something that directly reinforces your squat and deadlift patterns.
Final Thoughts
The Hatfield squat is a genuinely versatile tool that earns its place in nearly any strength program. It builds lower body strength, reinforces squat mechanics, challenges positional integrity under load, and can be scaled from light pump work all the way up to heavy strength sets. If you’ve been overlooking it, now is a great time to add it in.