Crossbody Cable Kickstand RDL: How to Do It, Muscles Worked, and Programming Tips
If you’re looking for a smarter way to attack hip mobility and posterior chain strength at the same time, the crossbody cable kickstand RDL deserves a spot in your training. This exercise blends the mechanical demand of a single-leg hinge with the rotational pull of a cable to open up the posterior hip capsule in a way that traditional RDL variations simply can’t replicate. Whether you’re a strength athlete, a competitive wrestler or grappling athlete, or just someone who feels chronically stiff in the hips, this movement can be a genuine game-changer.
Watch the video below on how to maximize this exercise.
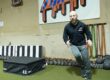
Equipment Setup
To perform the crossbody cable kickstand RDL, you’ll need access to a cable machine. Set the cable to the lowest position available and attach a standard D-handle. Start with a light to moderate load — this is a precision movement, not a max-effort pull, and using too much weight will immediately compromise your positioning and defeat the purpose of the exercise.
How to Do the Crossbody Cable Kickstand RDL
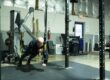
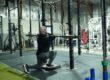
The setup begins in a kickstand stance: the front foot is flat on the floor, and the back leg is elevated slightly on the toe with a soft bend in the knee. Both knees remain slightly bent throughout the movement. Position yourself perpendicular to the cable machine — you are not facing it. The machine should be off to one side.
Here’s the key crossbody element: if you want to target your right hip, you grab the cable with your left hand and stand on your right leg. Hold the handle at approximately your hip pocket so your torso stays centered and neutral relative to your stance.
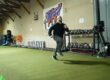
From there, initiate your hinge pattern. Push your hips back, load the glutes and hamstrings, and allow the cable — pulling across your body — to gently rotate your torso toward the machine side as you descend. As that rotation happens, the most critical technical point comes into play: your front leg knee must stay straight and tracking forward. The natural tendency is for the knee to flare outward, but you need to resist that. Keep the foot flat, keep the knee stacked, and let the cable do its job of driving your body into hip rotation.
At the bottom of the movement, you should feel a deep stretch in the glute and posterior hip capsule of the working leg. This is exactly what you’re after. From there, drive through the glute to return to the starting position, actively squeezing the glute at the top and rotating your “zipper line” away from the machine as you stand. That combination of stretch at the bottom and active contraction at the top is what makes this exercise so effective for both mobility development and glute training.
Muscles Worked
The crossbody cable kickstand RDL is a multi-function movement that targets several key areas:
- Glutes — both through loaded lengthening on the descent and active contraction at the top
- Hamstrings — loaded eccentrically through the hinge pattern
- Posterior hip capsule — stretched and mobilized through the rotational component
- Hip external rotators — challenged to maintain alignment and resist the cable’s pull
- Core and stabilizers — engaged throughout to maintain a neutral spine and balanced kickstand stance
Common Mistakes to Avoid
The most frequent error is allowing the front knee to flare outward during the rotational descent. This compensates for limited hip mobility and bypasses the very tissue you’re trying to access. Keep that knee pointing straight ahead regardless of how much the cable pulls you.
The second mistake is using too much weight. Excess load will cause you to lose the neutral position of the front foot — you’ll start rolling onto the outer edge — and your technique will break down entirely. Use only as much weight as allows you to move deliberately and feel the stretch and contraction clearly.
Programming the Crossbody Cable Kickstand RDL
This exercise fits naturally into several programming contexts:
As a loaded warm-up: Run through one to two sets before squats, deadlifts, or any athletic activity. The movement will prime your hips, improve mobility acutely, and get the posterior chain firing before you load heavier patterns.
As an accessory exercise: If hip mobility and hinging mechanics are a known weakness, program this after your primary strength work. It adds volume to the glutes and hamstrings while directly addressing the mobility deficit.
As a standalone mobility drill: On off days or recovery sessions, this movement works beautifully with minimal load to flush the hips, improve range of motion, and build long-term mobility without taxing the system.
In most cases, 1–3 sets of 10–15 reps per side is the sweet spot. Move slowly, control every rep, and prioritize feel over load. You should be chasing the stretch in the hip capsule and a quality glute contraction on every single repetition — if you’re not feeling both, adjust your mechanics before adding weight.