
The Three-Way Ankle: A Band-Based Complex for Ankle Rehab, Prehab, and Return to Play
The ankle is one of the most abused and least trained joints in the entire body. Athletes will spend hours chasing a bigger squat, a faster forty, or a higher vertical, but the moment their ankle rolls in a game or gives out on a landing, they realize how much they were relying on a joint they never actually built. The three-way ankle is a simple, banded complex designed to fix exactly that. It targets the small stabilizing muscles around the ankle that keep athletes healthy, resilient, and ready to return to sport after injury — and it does it with nothing more than a resistance band and a place to sit.
This article walks through the entire exercise: how to set it up, how to perform all three movements correctly, the anatomy that makes it work, the mistakes that quietly ruin its effectiveness, and how to program it whether you’re rehabbing an ankle sprain, bridging the gap out of physical therapy, or simply preparing an athlete’s lower legs for a heavy running load.
Watch the video below on how to maximize this exercise.
What Is the Three-Way Ankle?
The three-way ankle is a resistance-band complex that trains the ankle through three distinct movement patterns in a single sequence: inversion, eversion, and plantar flexion. Each direction loads a different set of muscles around the lower leg and ankle joint, so instead of hammering one muscle group and ignoring the rest, you build strength and control across the entire foot-and-ankle complex.
The word “complex” matters here. This isn’t one exercise — it’s three exercises stacked together and performed as a unit. You anchor a band around your foot, work one direction, rotate to the next, and finish with a banded calf raise. Run through all three and you’ve completed one round. It’s compact, it’s efficient, and it hits the joint from angles that traditional lower-body training almost never reaches.
Why Ankle-Specific Training Gets Overlooked
Most strength programs treat the ankle as an afterthought. The assumption is that squats, lunges, and calf raises will handle everything below the knee. Those movements are valuable, but they primarily load the ankle in one plane — up and down, through plantar flexion. They do very little for the muscles that resist your ankle rolling inward or outward, which is precisely the mechanism behind the most common ankle injuries in sport.
When an athlete sprains an ankle, it’s almost always the ligaments on the outside of the joint that get overstretched as the foot rolls under. The muscles responsible for pulling the foot back the other way — and for controlling that motion in the first place — are the peroneals on the outside of the lower leg. If those muscles are weak or underdeveloped, the ankle has very little active defense against rolling. The three-way ankle addresses this directly by training eversion, a pattern that standard programs almost entirely ignore.
The Anatomy Behind the Movement
Understanding what each direction trains makes the exercise far more effective, because you can actually feel for the right muscles working rather than just going through the motions.
Inversion
Inversion is the motion of turning the sole of the foot inward, toward the midline of the body. This is driven largely by the tibialis posterior and tibialis anterior — muscles that run down the front and inner portion of the shin. Training inversion builds control on the inside of the ankle and contributes to overall joint stability, arch support, and the ability to decelerate the foot as it lands.
Eversion
Eversion is the opposite: turning the sole of the foot outward, away from the midline. This is the job of the peroneal muscles (also spelled fibularis), which run down the outside of the lower leg. These are the muscles most directly involved in protecting against the classic rolled-ankle mechanism, and they are chronically undertrained in most athletes. Getting a big, full range of motion through eversion is one of the most protective things you can do for an athlete with a history of ankle sprains.
Plantar Flexion
Plantar flexion is pointing the toes down and away, the same motion you produce during a calf raise. This is powered by the gastrocnemius and soleus — the two muscles that make up the calf. Beyond the obvious role in jumping and sprinting, plantar-flexion strength and range of motion matter enormously for absorbing force on landing and pushing off during acceleration. Training it through a band lets you load the movement while chasing a bigger, more usable range of motion at the ankle.
Together, these three directions cover the ankle far more completely than any single traditional lift, which is exactly why the complex works so well for building durable, sport-ready lower legs.
Equipment You’ll Need
The beauty of the three-way ankle is that it requires almost nothing. You’ll need a moderate-strength resistance band and a place to sit. A plyo box works well because it elevates you enough to see and control your foot, but a bench, a chair, the edge of a couch, or even the floor will all get the job done. Sitting on something is mainly a matter of comfort and being able to see what your ankle is doing while you set up.
Band selection matters more than people expect. Too light and you’ll get no meaningful stimulus in the calf portion. Too heavy and you’ll lose the ability to control inversion and eversion through a full range of motion, which is where the real value lives. Start with a moderate band, and adjust from there based on how much clean, controlled range you can produce.
How to Set Up the Band
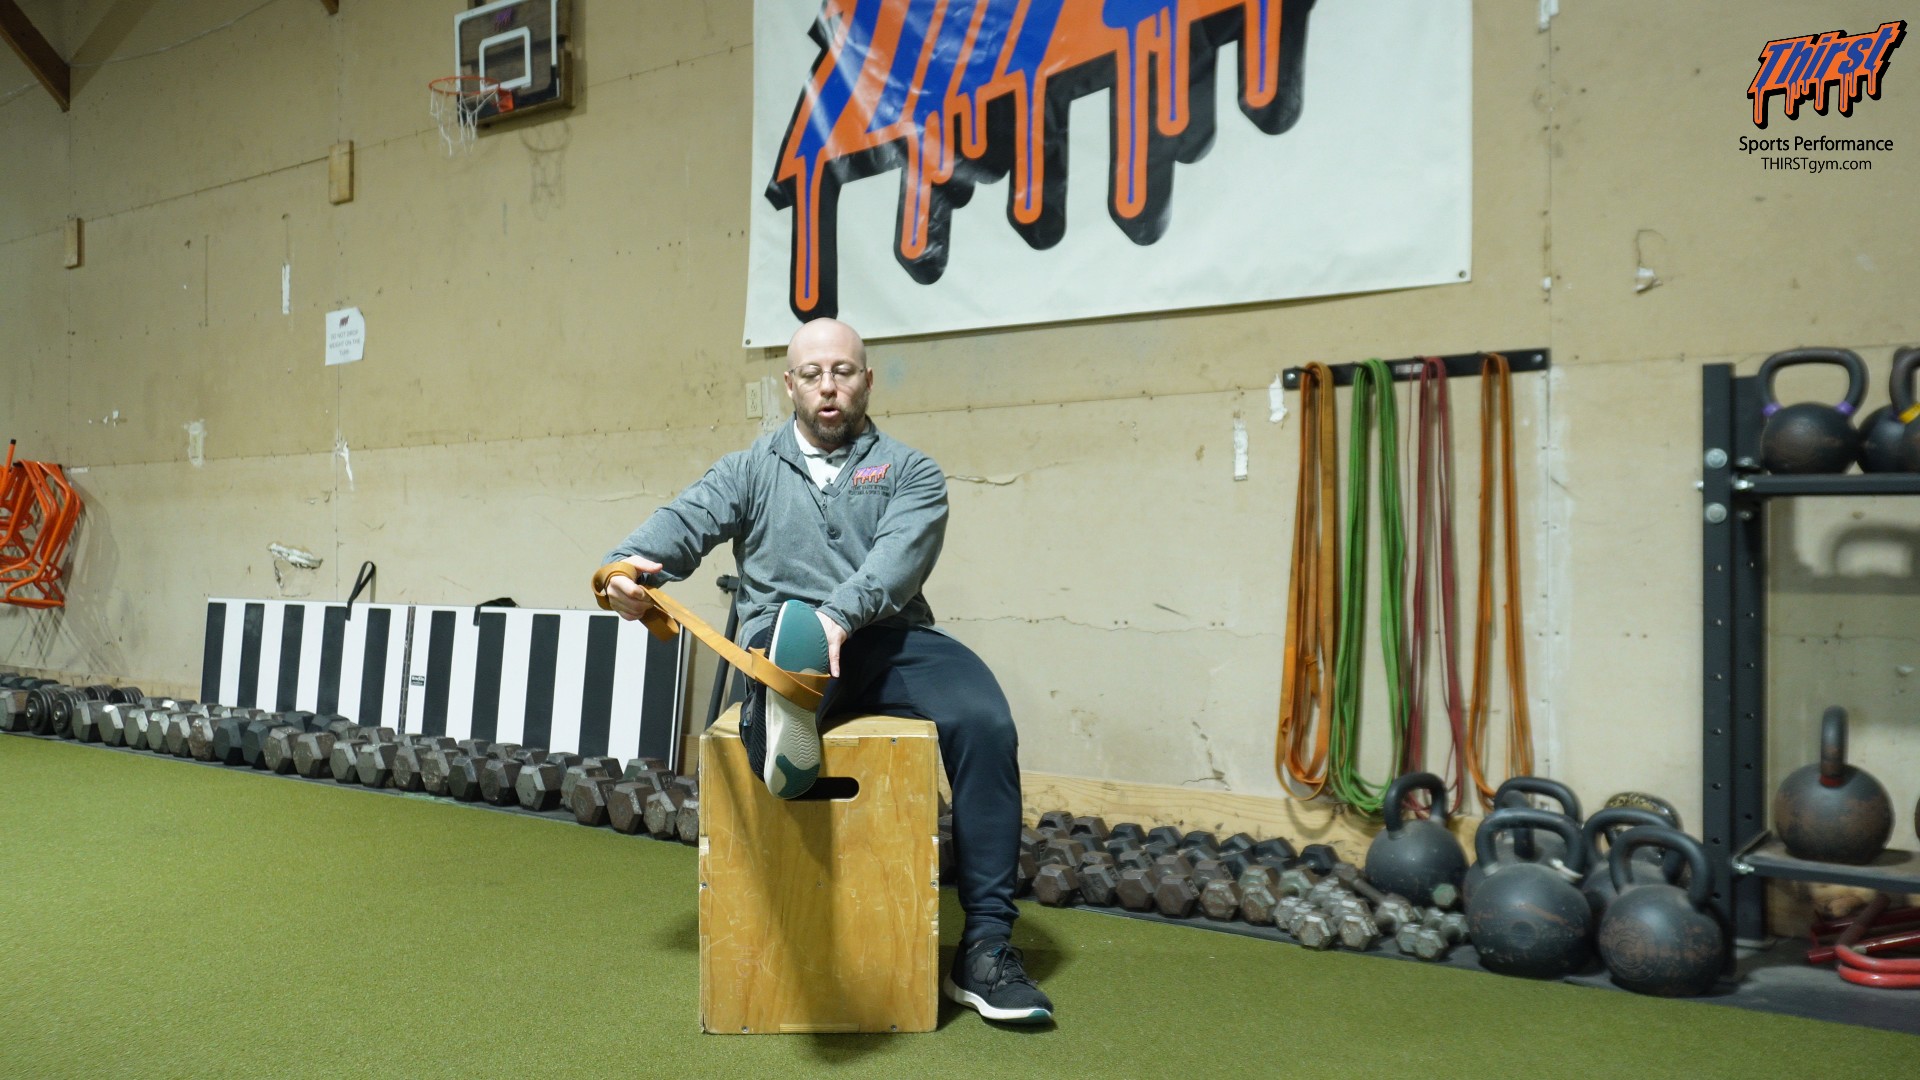
Setup is where a lot of people get sloppy, so it’s worth doing right. Take your resistance band and loop it around your foot, positioning it around the arch. Drifting slightly toward the higher side of the arch tends to feel most secure, though this is largely personal preference — find the spot that anchors cleanly against your shoe.
Once the band is in position, wrap it around a second time. This double wrap does two important things. First, it creates a quality anchor around your shoe so the band doesn’t slip mid-set. Second, it keeps the band from riding up and snapping you in the face, which is a real risk when you’re pulling against tension near your own body. The double wrap also leaves you holding two handles, giving you far better control over the direction and intensity of each pull.
With the band anchored, your legs should stay relatively straight throughout the movements. You’re not curling the leg or shifting your whole body — you’re isolating motion at the ankle and letting the band both stretch and load the joint.
The Three Movements
Perform the three directions in sequence. A common approach is to start on the lateral side, working inversion first, then rotate to eversion, and finish with plantar flexion.
Inversion
Pull the band out to the side, away from your body, keeping the leg relatively straight. Let the band open up your ankle into its stretched position, then drive against the tension by pulling the sole of your foot toward the inside — toward the midline of your body. If you’re working your right foot, the sole shifts toward the left. Move through your target reps here with control, feeling the muscles on the inside of the shin and ankle doing the work rather than yanking with the whole leg.
Eversion
Now bring the band across your body so it’s pulling in the opposite direction, and let it stretch your ankle deeply. Drive your ankle outward, turning the sole of your foot away from the midline. On the right foot, the sole rotates toward the right. The priority here is range of motion in the peroneals. Don’t cut this one short — a big, full arc of eversion is where the protective benefit for the outside of the ankle really comes from.
Plantar Flexion (Banded Calf Raise)
Grab both handles of the band and load up a good amount of tension. Start by letting your foot come back into dorsiflexion so you get a nice big stretch through the calf and the top of the ankle. From there, plantar flex — push your toe down and away, exactly like a standard calf raise, driving as hard as you can against the band. The goal is to move through the fullest range of motion you can produce at the ankle while genuinely feeling the calf do the work end to end. This isn’t a fast, bouncy rep. It’s a controlled push into a big range with real intent behind it.
Coaching Cues That Make the Difference
A few cues separate athletes who get results from this complex and athletes who just wave their foot around. First, keep the leg quiet. The motion should happen at the ankle, not at the hip or knee — if your whole leg is swinging, you’ve lost the isolation that makes this work. Second, chase range of motion actively. Let the band pull you into a full stretch at the start of every rep, then drive to full contraction at the end. The stretch-to-contraction range is the entire point. Third, feel the target muscle. For inversion, that’s the inside of the shin and ankle; for eversion, the outside of the lower leg; for plantar flexion, the calf. If you can’t feel the intended muscle working, adjust your band angle or reduce tension until you can.
Common Mistakes to Avoid
The most frequent mistake is using a band that’s too heavy, which forces athletes to shorten their range and recruit the whole leg to muscle through the reps. This defeats the purpose — you want clean, full-range control, not a grind. Another common error is rushing. These are small stabilizing muscles, and they respond to controlled, deliberate reps far better than fast, sloppy ones. A third mistake is neglecting the stretch. Many people only work the contraction half of each rep and never let the band pull them into a full lengthened position, missing out on the range-of-motion benefit that makes this complex so useful for return-to-play work. Finally, watch the setup — a single-wrapped band that slips mid-set not only ruins the rep quality but can genuinely snap up toward your face.
Who This Exercise Is For
The three-way ankle earns its place primarily in the world of rehabilitation and return to play. It’s an exercise commonly programmed for athletes coming back from a rehab process — those who have sprained an ankle, broken a fibula, or dealt with a knee injury that left them immobilized and off their feet for an extended stretch.
That period of reduced activity matters. When an athlete has been in a brace, on crutches, or otherwise limited in how much they load the leg, atrophy sets in through the lower limb — especially in the smaller muscles of the lower leg that don’t get much stimulus during everyday movement. The three-way ankle is a targeted way to start rebuilding that lost strength and re-establishing control at the ankle before the athlete returns to full sporting demands.
But rehab isn’t the only use case. This complex also works well as prehab. It fits naturally into a warm-up, and it’s especially valuable in an early preparatory phase when you’re ramping an athlete back into significant running volume they haven’t handled in a while. Loading the lower leg deliberately before you throw a big running load at it is one of the more effective ways to reduce the risk of shin splints and generally toughen up the lower limb for what’s coming.
For a healthy, well-conditioned athlete who isn’t dealing with any of these issues, this exercise usually isn’t a required staple. If the ankle is already strong and resilient, the complex can be used occasionally as part of a warm-up, but it doesn’t need to be a fixture in every session.
A Note on Scope of Practice
It’s worth being clear about where this exercise fits in the bigger picture. A strength coach is not a physical therapist, and the three-way ankle is not a replacement for professional rehabilitation. The real role of an exercise like this is bridging the gap — taking an athlete who has either been cleared from physical therapy, or whose physical therapist has trusted the coaching staff to implement supportive work, and helping carry them from the tail end of rehab into a full return to sport.
Done well, this kind of collaboration takes work off the physical therapist’s plate and lets the coach handle the training-side progression the athlete needs to actually get back on the field. The goal throughout is straightforward: prepare the athlete’s tissues so they can go out, play their sport, and do the things they love without their ankle being the weak link. If you’re an athlete working through a specific injury, always defer to your own medical provider on what’s appropriate for your situation.
Programming the Three-Way Ankle
Programming this complex is refreshingly simple. A common structure is one to three rounds, where a single round means completing all three movements back to back. Each movement is performed for roughly ten to twenty repetitions, adjusted to the individual athlete and how much clean range they can produce.
When there’s a clear injury or asymmetry, the priority goes to the leg that needs it most — you might do more volume on the affected side, or focus your attention there while still addressing the other leg. When you’re using it more generally for prehab or symmetrical development, simply alternate back and forth between both legs until you’ve completed your rounds.
Where you place it in a session depends on the goal. As dedicated rehab or prehab work, it fits well early in the session or as part of an extended warm-up, so the ankle is prepared before heavier or more dynamic work. As a warm-up primer before running-heavy days, a single round can be enough to wake up the lower leg. The complex is low in systemic fatigue, so it’s easy to sprinkle in without interfering with the rest of your training.
Progressions and Regressions
To make the three-way ankle harder, the simplest lever is band tension — move to a slightly stronger band once you can control a full range with clean form. You can also add reps, add rounds, or slow down the tempo to increase time under tension in the stabilizers. For athletes progressing toward return to play, the natural progression is eventually shifting toward more loaded, weight-bearing ankle work as tolerance improves.
To regress the movement, drop to a lighter band, reduce the range of motion to a pain-free arc, or lower the rep count while you build tolerance. For someone very early in a rehab process, prioritizing control and pain-free movement over range or load is always the right call. The complex scales cleanly in both directions, which is a big part of what makes it so useful across the entire spectrum from early rehab to prehab in a healthy athlete.
Final Thoughts
The three-way ankle isn’t flashy, and it won’t show up in anyone’s highlight reel. But it’s exactly the kind of unglamorous, targeted work that keeps athletes healthy and gets them back to sport faster after injury. Three movements, one band, a few rounds — and a lower leg that’s genuinely prepared for the demands of running, cutting, jumping, and landing. For any coach trying to bridge the gap from the rehab table back to the field, or any athlete looking to build an ankle that holds up, this complex belongs in the toolbox.