
The Kettlebell Jefferson Curl: How to Build a Stronger, More Resilient Lower Back
If your lower back feels tight, achy, or fragile after heavy squat and deadlift sessions, the problem usually isn’t that your spine is broken. More often, it’s that the small stabilizing muscles surrounding your spine are weak, under-trained, and stuck in a limited range of motion. The kettlebell Jefferson curl is one of the most effective and underrated tools for changing that. It trains segmental control through your entire spine, restores mobility you’ve likely lost, and strengthens the deep muscles that keep your back healthy under load.
This is a movement that gets dismissed far too often because it violates a rule most lifters were taught early: never round your back under load. But when it’s programmed intelligently and performed with control, loaded spinal flexion isn’t dangerous — it’s one of the best ways to build a back that holds up to everything else you throw at it. Below is a complete guide to what the Jefferson curl is, why it works, how to perform it correctly, and exactly how to fit it into your training.
Watch the video below on how to maximize this exercise.
What Is the Kettlebell Jefferson Curl?
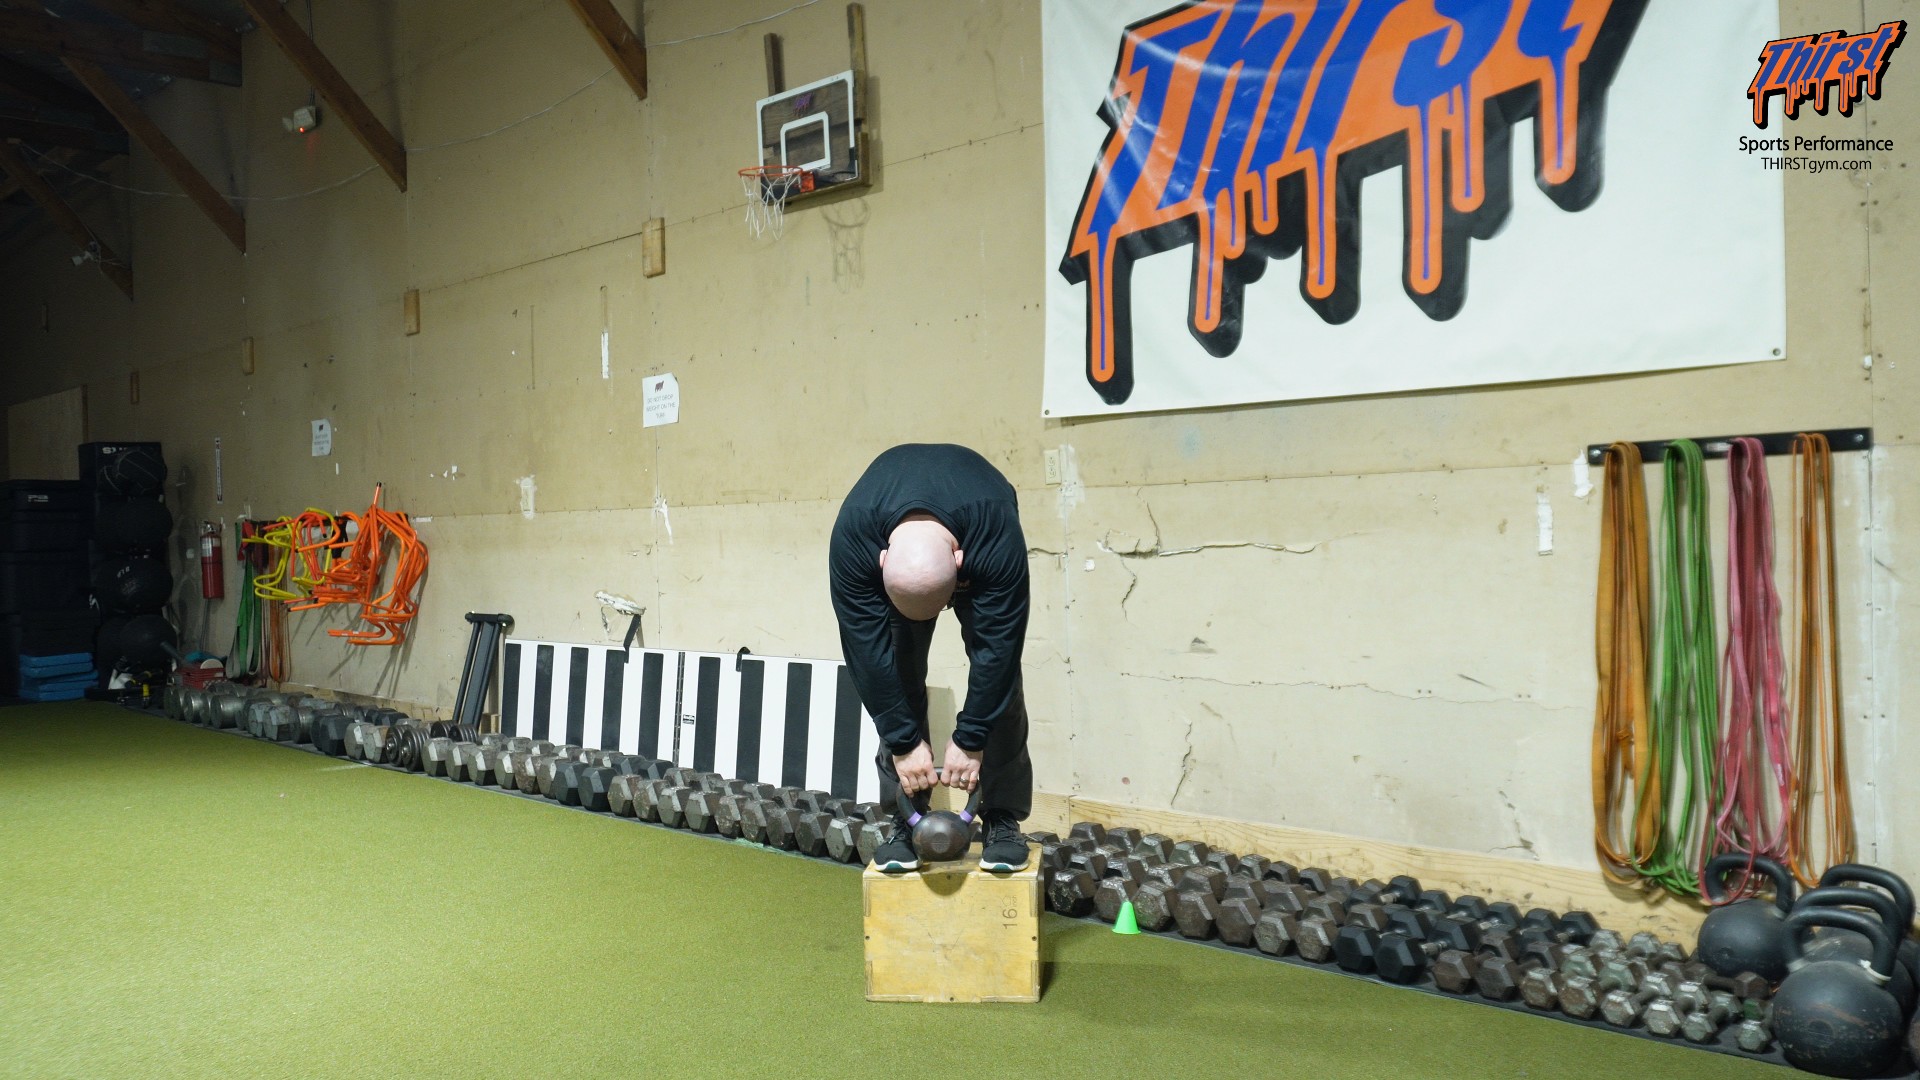
The kettlebell Jefferson curl is a slow, controlled spinal flexion exercise performed while standing on an elevated surface, holding a kettlebell in both hands. Unlike a hip hinge or Romanian deadlift, where you push your hips back and keep a rigid, neutral spine to load the hamstrings, the Jefferson curl is deliberately the opposite. The goal is to round your spine one vertebra at a time — from the top of your head all the way down through your tailbone — letting the weight gently pull you into deep flexion, and then reverse the movement by curling back up in the same segmented, controlled fashion.
Think of it less as a strength exercise in the traditional sense and more as a loaded mobility and movement exercise. It certainly builds strength in the low back and posterior chain, but its primary value is teaching your spine to move through a full, controlled range under manageable load. That combination of mobility and strength is exactly what most lifters are missing.
How It Differs From a Hip Hinge
The distinction between the Jefferson curl and a hinge matters, because most people default to what they know. In a deadlift or RDL, you’re trained to keep your knees relatively locked and your spine neutral while you drive your hips back. In the Jefferson curl, you unlock your knees just slightly and then intentionally allow your spine to flex segment by segment. You aren’t trying to load your hamstrings by pushing your hips back — you’re trying to let your whole back round as fully and evenly as possible. If you catch yourself hinging at the hips and keeping a flat back, you’ve turned it back into an RDL and lost the entire point of the exercise.
The Muscles Behind the Movement
Understanding what the Jefferson curl actually trains is what separates lifters who benefit from it from those who just go through the motions.
The Multifidi: Your Spine’s Deep Stabilizers
The real stars of this exercise are the multifidi — a series of small, deep muscles that run along each segment of your spine. These muscles are responsible for spinal segmentation: the ability of each individual vertebra to move independently and then return to its neutral position. Most people have poor control here because they never train it. They brace, they stay rigid, and they never ask the spine to move through its available range under load.
The Jefferson curl trains the multifidi in two ways. On the way down, these muscles lengthen under load as you round into flexion. On the way up, they contract to pull each vertebra back into its natural, neutral stacked position. That eccentric-lengthening-then-concentric-contraction cycle, performed slowly, is precisely the stimulus these small muscles need to get stronger and more coordinated. Stronger, better-controlled multifidi mean a spine that is more stable and more resilient during everything else you do in the gym.
The Erectors, Glutes, and Hamstrings
The Jefferson curl also directly strengthens your erector spinae — the long muscles running up either side of your spine that are responsible for extending your back. Because you’re lowering under control and then pulling yourself back up using your back, the erectors get significant time under tension.
You’ll also feel your glutes and hamstrings working, especially as you slow the tempo down. It isn’t the same hamstring loading you’d get from an RDL, but the posterior chain is absolutely involved in controlling the descent and driving the return. Going slowly is what recruits all of these muscles together and turns a simple movement into a comprehensive posterior chain and spinal health exercise.
Is Loaded Spinal Flexion Actually Dangerous?
This is the question that stops most people from ever trying the Jefferson curl, so it deserves a direct answer. You’ve probably been told that loaded flexion is the worst possible thing for your back and something you should never do. For a healthy individual, that simply isn’t true.
The spine is designed to flex. Avoiding flexion entirely doesn’t make it stronger — it makes it weaker and less tolerant of the exact positions you’re trying to protect it from. The key, as with any exercise, is intelligent loading. You start light, move slowly, and truly own the position throughout the entire range of motion. You don’t ego-load a Jefferson curl. You earn range and strength gradually over weeks and months.
It’s also worth being honest about why so many people have cranky lower backs in the first place. In many cases, it’s not a structural problem like a disc herniation — it’s simply a weak, deconditioned lower back that has never been asked to do much beyond bracing. A weak back gets strengthened by loading it, including through controlled flexion. That said, if you have a diagnosed lower back injury, disc issue, or ongoing pain, this is where a qualified professional comes in. See a doctor, chiropractor, or physical therapist before adding loaded flexion to your program. As a performance coach, my job is to help healthy athletes get stronger and move better — not to diagnose or rehab clinical injuries.
How to Perform the Kettlebell Jefferson Curl
Here’s how to execute the movement correctly from start to finish.
Set Up Your Equipment and Position
You’ll need a kettlebell and an elevated surface to stand on — ideally a plyo box, though a sturdy bench works too. The elevation gives the weight room to travel below your feet, which allows you to access more range of motion at the bottom. A standard box will still let you feel the exercise even if it doesn’t give you maximum range; more elevation simply means more available range for those with the mobility to use it.
Choose your kettlebell weight based on your capabilities and experience level. When in doubt, go lighter than you think. This is not a max-effort lift.
Stand on the box and move toward the front edge with your feet positioned directly underneath your hips. Hold the kettlebell with both hands, letting it hang in front of you, and keep your chest relatively tall to start.
Execute the Descent
Unlock your knees slightly — just enough to take them out of a fully locked position — and then allow the kettlebell to begin pulling you down. This is the mental cue that matters most: let the weight pull you into the movement rather than forcing yourself down. As you descend, tuck your chin toward your chest and begin rounding your spine from the top down. Reach and get as long as you possibly can through your entire back.
Move slowly and continuously. Keep going until you feel nicely rounded and in a comfortable end position for your current mobility. Your arms should stay long and relaxed the entire time — they aren’t doing any of the work; they’re simply a hook connecting you to the weight.
Reverse the Movement
Once you reach the bottom, you can pause and take a breath — inhale through your nose and exhale through your mouth to help everything relax and open up. Then curl back up slowly and with control, restacking your spine one vertebra at a time until you return to a tall standing position. This restacking on the way up is where you train segmentation and the multifidi most directly, so don’t rush it.
Progress Range Over Reps
On each subsequent repetition, aim to get slightly lower than you did on the previous one. You’re not chasing more weight — you’re chasing more range, earned gradually and safely across your working sets. Over time, that expanding range of motion is one of the biggest markers of progress with this exercise.
Common Mistakes to Avoid
The most frequent error is turning the Jefferson curl into a hip hinge. If you feel your hamstrings loading hard and your back staying flat, you’re pushing your hips back instead of rounding your spine. Reset and focus on flexing segment by segment.
The second mistake is loading too heavy too soon. Because this is a novel position for most people, the tissues need time to adapt. Start with a weight that lets you move with complete control, and add load only once the movement is smooth and you own every inch of the range.
Rushing the tempo is the third. The magic of this exercise lives in the slow, deliberate descent and the segmented restacking on the way up. Speed robs you of the exact stimulus that builds control and strength in the small spinal muscles.
Finally, don’t force range you don’t have yet. Get as round as your current mobility allows, and let that range expand naturally over weeks. Forcing it defeats the purpose and increases risk.
Progressions and Regressions
If the standard Jefferson curl is too much, regress it by performing the movement from the floor rather than a box. Removing the elevation limits your range of motion at the bottom, which reduces the demand while you build confidence and control. You can also start with just your bodyweight or an extremely light load before introducing a kettlebell at all.
To progress, add elevation to increase available range, slow the tempo down further, or gradually increase the load once your control is dialed in. If you have the ability to load it harder while maintaining perfect control, the Jefferson curl becomes a genuine strengthening exercise for the multifidi and erectors, adding another layer of resilience on top of the posterior chain work you’re already doing.
When and Why to Use the Kettlebell Jefferson Curl
There are three distinct ways to program this movement, and each serves a different purpose.
As a Pre-Training Warm-Up
The Jefferson curl shines as a warm-up before squat and deadlift days, especially if you tend to feel tight. Using a light weight, you focus on gradually increasing your range of motion across a few sets while getting the multifidi and surrounding tissues working and warm. The goal here is not fatigue — it’s movement quality. You’re waking everything up, loosening the low back and posterior chain, and priming your spine to move well under the heavier loads to come.
As a Post-Training Recovery Tool
After a hard lower-body session, your low back may feel tight, achy, or like you’re going to be sore tomorrow. The Jefferson curl is an excellent way to immediately drive blood flow into the area, open things up, and encourage movement around the spine. This can help you relax, recover, and feel noticeably better between training sessions. A few light, controlled sets at the end of a session can be the difference between walking out stiff and walking out loose.
As a Standalone Strengthening Exercise
You can also use the Jefferson curl on its own as a dedicated movement to strengthen the multifidi and lower back. When treated this way, it complements the standard posterior chain work you’re already doing — your deadlifts, RDLs, and other hip-hinge patterns — by targeting the small spinal stabilizers those exercises don’t directly train. This is how you bulletproof your back: pair the big posterior chain lifts with focused segmental strengthening, and you build a lower back that’s strong through its entire range, not just in a rigid neutral position.
Programming Guidelines: Sets and Reps
How you program the Jefferson curl depends on which of the three roles it’s playing.
As a warm-up, one to two sets of about five to eight repetitions works well, with the focus on gradually increasing range of motion across those reps. You’re not trying to fatigue anything — you’re getting everything moving and warmed up.
As a post-training recovery exercise, the same prescription applies: one to two sets of roughly five to eight controlled repetitions to drive blood flow and encourage movement.
When you’re training the Jefferson curl specifically to strengthen the multifidi and lower back, bump it up to two to three sets of eight to twelve repetitions. Because you’re moving slowly and with control, that rep range gives you ample time under tension to lengthen the tissues, improve range of motion, and build strength in the small spinal muscles. This is the sweet spot for meaningful adaptation.
Who Should Use the Kettlebell Jefferson Curl?
This exercise carries over to a wide range of athletes and lifters. Powerlifters and strength athletes benefit from the added spinal resilience and the improved recovery between heavy squat and pull sessions. Wrestlers and combat sports athletes, who constantly load and control their spines in flexed and awkward positions, gain valuable segmental strength and control that transfers directly to the mat. General fitness clients who sit all day and feel chronically tight often find it restores mobility and takes the edge off nagging stiffness. Older adults, in particular, can benefit from safely reintroducing controlled spinal movement, since maintaining the ability to flex and control the spine is a genuine quality-of-life issue as we age — though this population should progress especially conservatively and clear it with a professional if there’s any history of back trouble.
When to Skip It and Seek a Professional
To be clear: if you have a diagnosed lower back injury, a disc herniation, or persistent pain, don’t self-prescribe loaded flexion. See a doctor, chiropractor, or physical therapist first. This exercise is intended for healthy individuals looking to build strength and mobility, not as a rehab protocol for an active injury. Used appropriately by a healthy lifter, though, it can absolutely help a weak, cranky lower back start to feel better and function stronger.
Final Thoughts
The kettlebell Jefferson curl is a rare exercise that delivers mobility and strength at the same time while addressing a part of the body most lifters neglect entirely. Approached with patience — light loads, slow tempo, and range earned gradually — it strengthens the deep multifidi and erectors, involves the glutes and hamstrings, and teaches your spine to move and control itself through a full range of motion. Whether you use it to warm up, to recover, or as a standalone builder, it’s one of the smartest additions you can make to a program built around heavy squats and deadlifts. Own the position, respect the progression, and let your back get stronger through the very range you were told to avoid.