")
The Only 5 Ab Exercises You Need (Based on EMG Research)
Most ab exercises are a complete waste of your time. After years of coaching athletes, lifters, and general fitness clients at THIRST Gym, and after digging through the EMG research on what actually activates the muscles of the midsection, I’ve narrowed down the entire universe of core training to just five exercises that deserve a permanent spot in your program. Whether you’re a competitive powerlifter, a combat sports athlete, a high school sport athlete trying to develop a more resilient midsection, or simply someone who wants to train smarter and stop wasting time on movements that don’t deliver results, this is your roadmap to a stronger, more functional core.
You can also watch the video below that goes along with this article.
Quick Anatomy Lesson: What Your “Core” Actually Is
Before we get into the exercises themselves, it’s worth taking a few minutes to understand what we’re actually training when we talk about the abs, core, trunk, or midsection. Too many lifters treat the core like it’s one muscle, and that misunderstanding leads them straight into hours of crunches that never produce the strength, stability, or visual results they’re chasing.
The first muscle group is the rectus abdominis. This is the “six-pack” muscle that runs vertically down the front of your torso, and it’s what most people are picturing when they think of trained abs. It flexes the spine and is responsible for that visible segmented appearance you see on lean athletes, fitness models, and magazine covers. The reality nobody wants to hear is that you can do thousands of crunches and never see them if your body fat is too high. Visibility comes from nutrition, not from volume of ab work. If your goal is purely aesthetic, your kitchen matters far more than your gym time. With that said, the rectus abdominis still plays a real role in trunk flexion and force transfer, so we’re not going to ignore it.
Next up are the internal and external obliques. These muscles run along the sides of your torso and wrap down toward your belly button at an oblique angle, which is exactly where they get their name. They’re responsible for rotation, lateral flexion, and resisting both of those forces when you need to stay rigid under load. For combat sports athletes, throwers, rotational power athletes, and really anyone who wants a midsection that performs as well as it looks, the obliques are non-negotiable.
Finally, there’s the transverse abdominis, often shortened to the TVA. This is the deep muscular sheath that wraps around your midsection like a built-in lifting belt. You’ll never see it because it sits underneath the other abdominal muscles, but it’s arguably the most important from a performance standpoint. The TVA stabilizes your spine, maintains intra-abdominal pressure, and keeps your midsection rigid during heavy compound lifts like squats and deadlifts. If you’ve ever wondered why some lifters seem unbreakable under heavy loads while others fold in half, the answer often comes down to TVA function.
A well-rounded ab training program needs to address all three layers. The exercises below are chosen specifically because, when programmed together, they cover flexion, anti-extension, anti-rotation, anti-lateral flexion, and rotational strength. That’s the full picture of what the trunk is supposed to do.
Exercise 1: The Dead Bug (And How to Level It Up)
Yes, the dead bug. I can already hear the eye rolls. Most lifters consider the dead bug a beginner exercise, something physical therapists hand out to grandparents, not something a serious athlete should bother with. That’s a mistake. The dead bug, when loaded and progressed correctly, is one of the most effective anti-extension exercises you can do, and it directly trains the coordination between your diaphragm, your TVA, and your pelvic position under load.
The basic version starts on your back. Bring your knees up into a 90-90 position, meaning your hips are flexed to 90 degrees and your knees are bent to 90 degrees. Reach your hands straight up toward the ceiling. Posteriorly tilt your pelvis so that your lower back is flat against the floor with no arch. Once you’re in this position, you should already feel your midsection turn on. It should feel rigid, almost like a horizontal plank. From there, you’ll reach the opposite arm and leg out long, keeping your head on the ground and pulling your toes toward the ceiling. The closer your limbs get to the floor without losing your flat back, the harder the exercise gets. Then you switch sides.
If you’re new to the movement, perform it for holds rather than reps. Build the strength to maintain that neutral spine before you add tempo. Once you can hold each side for 10 to 20 seconds with a flat back, switch over to repetitions of 5 to 10 per side, focusing on quality over speed.
To take it further, here’s where most people miss the boat. Anchor a band to a rack at floor level, lay underneath it with your head toward the rack, and pull the band over your face with both hands so you have meaningful tension. The band tries to pull your arms overhead, and your job is to resist that pull while staying flat. Now drive your leg out long. Suddenly the dead bug stops being easy. Your lats have to engage, your rib cage has to stay set, and your TVA has to fire constantly to keep you from arching.
The other progression I love is the kettlebell or dumbbell pullover dead bug. Grab a 10 to 20 pound weight, hold it overhead with both arms, and as you reach one leg long, slowly bring the weight overhead in a pullover pattern. You’re now combining a loaded anti-extension challenge with hip flexor demand and lat activation. Five to ten reps per side will absolutely smoke your midsection.
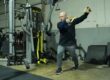
Exercise 2: The Hanging Leg Raise
The hanging leg raise has a reputation as a hip flexor exercise, and that’s fair when it’s done poorly. Done correctly, it’s one of the best loaded flexion exercises for the rectus abdominis you can program. The key word is correctly.
Most lifters approach the hanging leg raise like a CrossFit kipping pull-up. They swing, they generate momentum, and they essentially do a hip flexor exercise with their lower abs along for the ride. That’s not what we want. The whole point of the hanging leg raise is learning to posteriorly tilt your pelvis, which means tucking your hips underneath you and using your abs to drive that motion.
Here’s how to set up correctly. Hang from a pull-up bar or a chin-up bar. Pull your legs slightly forward in front of you so that you can feel your abs engage right from the start. From there, drive your hips underneath you, lifting your legs as high as you can while maintaining that posterior tilt. Lower under control. The bar doesn’t have to touch your feet for this to be effective. What matters is that the abs initiate and finish the movement, not the hip flexors.
If a full leg raise is too much right now, scale it to a knee raise. Same setup, same posterior pelvic tilt, but you’ll just bring your knees up toward your chest. As you build strength, progress from knee raises to straight leg raises. If your grip is your limiting factor, use lifting straps so that you can train the abdominals to fatigue without your forearms giving out first.
For variety, you can also alternate legs, lifting one leg at a time and going back and forth. Same rules apply: post the pelvis first, drive with the abs, control the descent.
Program this for two to four sets of as many reps as you can perform with strict technique. When you do this exercise correctly, you will feel it the next day, and the rectus abdominis development you’ll get from it carries over to everything else you do.
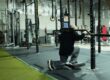
Exercise 3: The Pallof Press
The Pallof press is the gold standard anti-rotation exercise, and it’s one of those movements that has somehow become a battleground in the strength and conditioning world. There’s a camp that swears the Pallof press is the king of all core exercises, and there’s a camp that argues it’s overhyped because the human body is built to rotate. I’m somewhere in the middle. Both groups have a point. Your trunk needs to rotate, but it also needs to resist rotation, especially under load. So we train both.
To set up, anchor a band or attach a cable handle at chest to belly button height. Grab the band or handle with both hands, walk away from the anchor until you’ve created enough tension that you can feel it pulling you sideways, and stand with your feet just outside hip width. Bring the handle in to your chest. Now press it straight out in front of you and resist the urge of the band trying to rotate your torso back toward the anchor point.
The whole exercise is about resisting movement. Your body shouldn’t twist, your hips shouldn’t shift, your shoulders shouldn’t dip. The only thing moving is your arms. Press out, hold for a brief second, return to your chest under control. Repeat.
You can also do this as a static hold, where you press out and simply maintain the position for a set time, fighting the rotational pull the entire duration. Both variations are valuable, and they hit slightly different demands.
There’s a whole menu of stance variations to keep you busy for years. Perform Pallof presses in a half-kneeling stance, a tall-kneeling stance, a split stance, or even a single-leg stance to add a balance and stability component. You can add an overhead reach at the top of the press to introduce anti-lateral flexion, which means you’ll have to fight the band trying to pull you sideways as well as twisting you. That overhead variation is brutal in the best possible way.
For programming, hold for 10 to 20 seconds per side if you’re doing isometric variations. If you’re doing reps, aim for 8 to 15 per side, and prioritize quality. The Pallof press is meant to feel almost robotic, with smooth presses, brief holds, and controlled returns. Don’t rush.
If you want to bring rotation into your training, use the same setup but instead of just pressing straight out, rotate your upper body away from the anchor as you press, then control the rotation back. Keep your feet square so the rotation comes from your thoracic spine, not your hips. That gives you the anti-rotation benefits and the rotational strength benefits in one exercise. Eight to twelve reps per side is the sweet spot here.
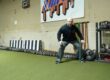
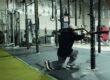
Exercise 4: The Ab Wheel Rollout
EMG research has shown that the ab wheel rollout, performed correctly, can produce up to 140 to 160 percent more rectus abdominis activation than a standard crunch. That’s an enormous return on investment, and it’s exactly why this exercise has such a strong reputation. The catch is in those two words: performed correctly. The vast majority of lifters who use the ab wheel are doing it wrong, dumping into their lower back, sticking their butt up in the air like they’re posing for a photo, and missing the entire point.
Here’s how to do it the way it’s supposed to be done. Start on your knees with the ab wheel directly underneath your shoulders. Before you even move, bring your hips forward and tuck them underneath you. Your belly button should be reaching toward the floor and your ribs should be stacked over your pelvis. If you’re set up correctly, you should already feel your abs working just to maintain this neutral position. From here, slowly roll the wheel out in front of you, keeping your hips moving along with the wheel so you stay in one long, rigid line. Roll out until you feel maximum tension or until you can’t maintain the neutral spine. Then drive back to the start position under control, stopping when your hands return underneath your shoulders.
The reason this exercise is so effective is because it loads your abs eccentrically through a long range of motion. Eccentric loading is one of the strongest drivers of both strength and hypertrophy, and the ab wheel rollout uses gravity and bodyweight to create that eccentric demand without any complicated equipment. If you’re training the rectus abdominis for both strength and visual development, this is one of the best tools available.
For most people, kneeling rollouts are the right starting point. Five to ten reps is a great place to begin, and you can build up to 15 or even 20 over time. The progression isn’t usually about reps, though. It’s about range of motion. You want to roll out longer and longer, getting closer to fully extended, before you have to drive back. Once you can do bodyweight rollouts from your feet without losing position, you’re in elite territory. Most lifters never get there, and that’s okay. Kneeling rollouts done well will build a midsection that feels and performs like steel.
If you don’t have an ab wheel, a barbell loaded with 10-pound plates on each side works fine. It rolls smoothly enough to mimic the wheel and it’s available in just about every gym.
Exercise 5: The Kneeling Cable Crunch
The kneeling cable crunch is the loaded flexion exercise that finally lets you apply progressive overload to your ab training. That’s the piece most people miss. We obsess over progressive overload for our squats, benches, and deadlifts, but we treat ab training like it doesn’t follow the same rules. It does. Adding load over time is exactly how you build a thick, strong rectus abdominis, and the cable crunch is the easiest way to track and progress that load.
Set up by attaching a rope attachment to a cable machine. A spud abstrap also works well if you have one available. Pull the cable up so the attachment is at head height when you’re kneeling. Get directly underneath the cable, or even slightly forward of it, and grip the rope so it’s right next to your head with your elbows tucked in by your ears.
From this top position, you want tension on your abs already. Your hips should be slightly forward and you should feel your glutes engage to set your pelvis. Now drive your elbows down toward your knees by curling your spine. The motion is a spinal flexion, not a hip hinge. You’re not bowing forward at the hips. You’re rounding your upper body and contracting your abs to bring your ribcage closer to your pelvis. Hold the bottom for a brief second, then return to the top under control.
The classic mistake here is letting your hips travel back as you crunch, which converts the entire exercise into a hip hinge with cable resistance. That’s a complete waste of time. Keep your hips forward, your pelvis set, and let the work happen entirely in your trunk.
Aim for 10 to 20 reps per set, working until you feel a deep contraction or your abs start to cramp. Add weight every couple of weeks. Track your numbers like you would for any other lift.
If you want to take this exercise to the next level, drop the cable to the bottom pulley and use a lighter weight than you’d use kneeling. Lay on your back with your head toward the cable, hold the rope by your head, and perform a reverse cable crunch by drawing your knees up toward your chest while keeping your pelvis tucked. You’re combining the benefits of the dead bug, the hanging leg raise, and the cable crunch into one loaded reverse crunch. Ten to fifteen reps with a focus on a long, lengthened start position will build the lower abs in a way that almost nothing else does.
How to Program These Into Your Training
The exercises themselves are only half the equation. The other half is how you use them. There’s no point in knowing the best five ab exercises if they never make it into your weekly schedule, so here’s exactly how to put them to work.
If your trunk strength is a weakness and you’ve identified that as a limiter for your performance or your training, treat it like any other weakness and attack it first while you’re fresh. Pick one of the five exercises and use it as part of your warm-up before your main session. Dead bugs, in particular, are excellent before a squat or deadlift session because they wake up the TVA and teach you to brace before you ever load the bar. This is how I program ab work for most of my athletes whose trunk is the bottleneck holding their performance back.
If trunk strength isn’t a glaring weakness but you still want it in your program, which you should, choose one or two of these five exercises per training day and place them toward the end of the session so they don’t interfere with your main lifts. The exception is when you superset them with non-competing movements like arms, shoulders, or single-leg work. Supersetting ab work into rest periods is one of the easiest ways to get more volume without adding extra time to your training.
When you’re pairing exercises, choose movements that hit different patterns. A hanging leg raise paired with a Pallof press works beautifully because one is loaded flexion and the other is anti-rotation. A dead bug paired with a Pallof press is redundant because both are essentially anti-extension and anti-rotation through similar planes. Mix patterns to get more out of every session.
A weekly target of two to four dedicated ab training exposures is usually plenty for most lifters and athletes, assuming you’re training the trunk hard during your compound lifts as well, which you should be. Heavy squats, deadlifts, presses, and carries all train the core in their own right, and your direct ab work is meant to fill the gaps and address weaknesses, not replace what those big lifts already do.
Putting It All Together
The five exercises I’ve covered here, the dead bug, the hanging leg raise, the Pallof press, the ab wheel rollout, and the kneeling cable crunch, give you full coverage across every job your trunk is asked to do. You’ve got anti-extension, loaded flexion, anti-rotation, eccentric anti-extension, and progressive-overload-friendly flexion all in one tight package. You don’t need ten more exercises. You need to do these five well, train them with intention, and progress them over time the same way you progress everything else in your program.
If you’ve been spending hours of your week on ab work that hasn’t moved the needle, throw out everything you’ve been doing and rebuild your trunk training around these five movements. Within a few weeks, you’ll feel the difference in your compound lifts, in your sport, and in everything else you ask your body to do.
Need help improving your health, fitness, and wellness? Contact us to see how we can help you!