Hatfield Front Foot Elevated Split Squat: How to Build Stronger, More Stable Single-Leg Strength
The Hatfield front foot elevated split squat is one of the most underrated lower body exercises you can add to your training program, and it’s a staple piece I program regularly with my athletes and clients here at THIRST Gym in Terre Haute, Indiana. By combining the stability of the Hatfield-style support with the increased range of motion of a front foot elevated split squat, this exercise allows you to push significantly more load than a traditional split squat while attacking strength, size, and mobility simultaneously. If you’ve ever felt like balance was the limiting factor in your single-leg work, this variation is going to be a game-changer for your training.
Watch the video below on how to maximize this exercise.
Equipment You’ll Need
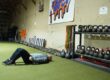
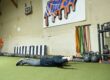
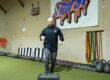
To set this exercise up, you’re going to need a safety squat bar, a power rack or rig, and a one to three inch deficit for your front foot. The deficit can be created with DC blocks, a 45-pound plate, a couple of mats, or anything else stable enough to stand on. You’ll also want band pegs or a barbell positioned in front of you for support. Personally, I prefer band pegs because they’re easier to slide in and out of the rack compared to setting up a second barbell, but if you only have a standard power rack, throwing a barbell across the safety arms works just fine. The Hatfield setup is what gives this movement its name, and the support points in front are the key feature that separates it from a standard split squat variation.
How to Perform the Hatfield Front Foot Elevated Split Squat
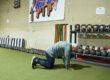
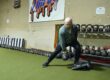
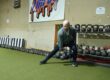
Start by getting underneath the safety squat bar with your front foot positioned on your elevation of choice. Keep your chest tall, unrack the bar, and grab onto the band pegs in front of you for stability. Get into your split squat position with the front leg flat on the deficit and the back leg up on your toe. From there, you’re going to descend down, trying to get your back knee to the ground or as close to it as possible, then drive back up by pushing through the entirety of your front foot. After you finish your reps on one leg, switch sides and repeat the same pattern. The most important coaching cue here is that you should not be death-gripping the band pegs and pulling yourself up out of the bottom. The hands are there strictly for stability, not to assist the lift. If you start using your arms to muscle the weight up, you’re missing the entire point of the exercise.
Why This Exercise Works So Well
The biggest benefit of the Hatfield front foot elevated split squat is that it removes balance and instability from the equation, which lets you actually load the movement heavy enough to drive strength and hypertrophy adaptations. So many lifters cap out their split squat loading not because their legs aren’t strong enough, but because they can’t stay upright and balanced under the bar. By giving yourself those stability points, you can push the weights up and get the true strength and size benefits of unilateral training. The front foot elevation also gives you a deeper range of motion, which translates to greater glute activation and can help shift your center of mass back, allowing you to stay more upright through the lift. That upright torso position is huge for athletes who struggle with hip and ankle mobility, because the elevation effectively meets them where they are while still letting them train through a full range of motion.
Programming Recommendations
I program the Hatfield front foot elevated split squat as a general strength or supplemental movement, typically for two to four sets of three to eight reps on each leg depending on the goal of the training block. If we’re chasing pure strength, we’ll stay on the lower end of the rep range with heavier loads. If hypertrophy is the priority, we’ll bump the reps up and chase a bit more time under tension. This exercise fits especially well into offseason training blocks where you’re trying to build a foundation of single-leg strength and load up the lower body without the systemic fatigue of heavy bilateral squatting.
One thing worth noting is that the safety squat bar itself weighs 65 pounds, which can be too much loading for younger athletes or beginners who aren’t strong enough yet. In those cases, I’ll regress to a goblet front foot elevated split squat or a dumbbell variation until they build the base strength needed to handle the bar. Once they can manage the bar comfortably, the Hatfield front foot elevated split squat becomes a fantastic way to level up their split squat training and continue progressing.
Final Thoughts
If you’re looking for a way to take the brakes off your single-leg training and actually load up your split squats heavy, the Hatfield front foot elevated split squat needs to be in your program. It checks every box: strength, hypertrophy, mobility, and athletic carryover. Give it a try in your next training block and let me know how it goes in the comments below.
If you have any questions about how to program this exercise or want to work with me directly on your training, reach out through THIRST Gym and I’ll get you sorted. Train hard, train smart, and I’ll catch you in the next one.