Band Resisted Hip Airplane — How to Do It, Muscles Worked, and Mobility Benefits
The band resisted hip airplane is one of the most effective tools you can add to your warm-up or mobility routine if you are dealing with tight hips, limited range of motion, or just want to get more out of your hip capsule work before squatting, deadlifting, or any athletic activity. At THIRST Gym, this variation has become a go-to for athletes and lifters who struggle to fully access their hip mobility with bodyweight alone, and for good reason — the band does something that bodyweight simply cannot.
Watch the video below on how to maximize this exercise.
What Makes the Band Variation Different
The standard hip airplane is already a valuable drill for opening up the posterior hip capsule and getting the glute to fire through rotation. But for a lot of people — especially those who are stiff, less mobile, or new to hip hinge patterns — bodyweight alone does not provide enough of a pull to really sink into that stretch. That is where the band comes in. By looping a light to moderate resistance band from your shoulder, across your back, and around the working leg, you create a constant pull that drives your hip into the stretch position. This helps you access a deeper range of motion than you might otherwise reach on your own, which is exactly what mobility training is supposed to do.
How to Set Up the Band Resisted Hip Airplane
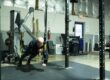
You will need a light to moderate resistance band — an EliteFTS light band works perfectly here — and something sturdy to hold onto for balance, like a squat rack or a post. To set up for the left hip, thread your left arm through the band so it sits across your shoulder like a backpack strap. From there, bring the band around your back so it crosses over your right hip pocket, then loop it around your left leg. That diagonal line of tension from your shoulder across your back and down to your working leg is what creates the pull into the hip stretch.
Once you are banded up and holding onto your support, hinge forward and let the band pull your hip down and back into that deep posterior hip capsule stretch. Breathe in through the nose, exhale through the mouth, and really let yourself sink into that position. Do not rush past it. The goal is to feel the hip open up fully before you do anything else.
Performing the Movement
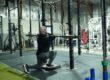
From that deep stretched position, use your glute to rotate the leg open, driving out against the band resistance. That resistance is not just helping you get into the stretch — it is also giving your glute something to work against on the way out, improving the quality of the contraction. Rotate out to feel the stretch on the other side of the hip, then rotate back down into the starting stretch position. The movement is rhythmic: sink in, breathe, drive out, squeeze, and return.
Focus on quality over speed. Each rep should include a genuine breath at the bottom of the stretch and a strong, intentional glute contraction at the top of the rotation. Five quality reps per side is the target, repeated for two to three sets until you feel your hips opening up and responding well.
When and How to Program It
The band resisted hip airplane fits naturally into a warm-up before lower body training. Use it before squats, deadlifts, or any hip-dominant movement to prime the posterior hip capsule and get the glutes firing before you load them. It also works well on dedicated mobility days or corrective sessions where the goal is addressing movement limitations and building long-term hip health. If you want to increase the challenge and drive even deeper into the stretch, moving to a heavier band is a simple progression that keeps the exercise effective as your mobility improves.
Whether you are an athlete trying to move better on the field, a powerlifter managing hip tightness under heavy loads, or someone who just wants healthier hips in everyday life, the band resisted hip airplane belongs in your toolkit.