5-Step System to Implement Plyometrics: Beginner to Advanced Training Guide
Are you looking to improve your athleticism or just getting started with plyometrics in your training routine? This comprehensive 5-step system will ensure that you not only implement plyometrics properly but also optimize your training to become a better athlete.
Check out the video below that goes along with this video to help aid you in implementing these plyometrics.
Understanding the Science Behind Plyometrics
Before diving into the progression system, it’s crucial to understand what’s happening in your body during plyometric exercises. There are three key phases that make plyometrics so effective:
- Concentric Phase: This is the “rising” or “lifting” aspect – when you’re actively pushing off the ground during a jump.
- Eccentric Phase: This is the “loading” or “landing” phase – when you’re absorbing force as you land.
- Amortization Phase: This is the most important aspect of plyometric training. It’s the brief transition period between eccentric and concentric phases – the “in-between” moment when force absorption switches to force production.
The shorter your amortization phase, the more “springy,” athletic, and explosive you become. Elite athletes have extremely short amortization phases, allowing them to redirect force rapidly. Our goal with plyometric training is to systematically shorten this phase, significantly improving your athletic performance.
The 5-Step Plyometric Progression System
Let’s break down the five phases of improving your plyometrics from beginner fundamentals to advanced athletic movements.
Step 1: Master Landing Mechanics
The foundation of all plyometric training starts with learning how to land properly. This might sound simple, but you’d be surprised how many athletes (even at higher levels) have poor landing mechanics.
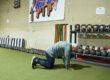
Option 1A: Snap Downs If you’re very new to plyometrics or working with young athletes, start with snap downs. These require minimal force absorption and only use bodyweight and a small amount of space.
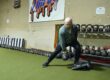
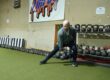
Option 1B: Depth Drops If you have some experience, focus on depth drops with proper landing mechanics. Start low – we’re talking about 12-18 inches maximum height – and concentrate on:
- Landing on the balls of your feet first, then heels
- Creating a “soft touch point” (quiet landings)
- Loading your hips and posterior chain
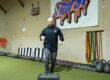
- Maintaining an athletic stance
Learning to absorb force properly is essential before you start producing force. Your body can handle much more eccentric loading (landing) than concentric (jumping), so building this foundation first ensures safety and creates the base for all subsequent plyometric work.
Step 2: Implement Box Jumps
Once you’ve mastered landing mechanics, it’s time to add box jumps or exercises that get your feet elevated during the jump phase.
Box jumps are popular for good reason:
- They allow you to express maximum force with each jump
- The elevated landing surface reduces the landing forces
- You can practice power production while minimizing excessive ground contact forces
This is a crucial intermediate step because high ground contact activities without proper progression often lead to shin splints, knee pain, and other overuse injuries. Your tendons and connective tissue need time to adapt.
When performing box jumps:
- Focus on maximum effort with each repetition
- Use your landing mechanics from Step 1
- Prioritize quality over height
- Step down (don’t jump down) to minimize unnecessary impact
Step 3: Progress to Ground-Based Jumps
The next progression is removing the box and performing vertical jumps with full ground contact. This can include:
- Vertical jumps in place
- Hurdle hops
- Standing broad jumps
Start with “dead stop” jumps where you fully absorb each landing before initiating the next jump. This reinforces proper landing mechanics while adding the component of force production.
Once comfortable with single jumps, you can gradually make them more continuous and “springy,” but maintain these key principles:
- Keep heights moderate to start
- Maintain soft landings
- Gradually decrease ground contact time
- Use the stretch-shortening cycle to your advantage
This phase is critical for building tissue and tendon resiliency. If you push too hard too fast, your body will let you know through pain and discomfort. Progress gradually – you need to train to be springy before you can become springy.
Step 4: Depth Drops into Reactive Jumps
Now that you’ve built a foundation, it’s time to integrate depth drops with reactive jumps. This is where we really start training the amortization phase.
The key concept here is to use a depth drop height that challenges your vertical jump capacity. For example:
- If your vertical jump is 18 inches, you might start with a 16-18 inch depth drop
- Gradually increase the height beyond what you can jump naturally
- This creates greater eccentric forces than your body normally experiences
A common progression is the depth drop to box jump:
- Stand on a box higher than your vertical jump
- Step off (don’t jump off)
- Land in your athletic position
- Immediately explode up onto another box
This lengthens the amortization phase initially due to the higher forces, which then creates a stronger stretch reflex for the subsequent jump. Your body has to absorb more force than usual, which stimulates adaptations that make you more explosive.
Important notes for this phase:
- If the drop height is too high, you’ll feel “glued to the floor”
- Start only 3-6 inches above your vertical jump capability
- Progress very gradually as tendons and ligaments adapt
Step 5: Advanced Plyometric Combinations
Once you’ve mastered the previous four steps, it’s time to get creative with advanced variations:
- Depth drops to lateral bounds
- Reactive broad jumps
- Rotational landings
- Single-leg variations
- Multi-directional combinations
At this level, you’re tailoring plyometrics to mirror the demands of your specific sport while challenging your body in new ways. The fundamental principles remain the same, but the exercises become more complex and sport-specific.
Some examples of advanced plyometric combinations include:
- Depth drop to lateral bound to vertical jump
- Single-leg hop to opposite leg landing with rotation
- Hurdle hops combined with broad jumps
- Multi-directional reactive jumps with minimal ground contact
This is where your imagination becomes the limiting factor. However, remember that these advanced variations should only be attempted after thoroughly mastering the previous steps.
Programming Plyometrics Effectively
Now that you understand the progression system, let’s talk about how to implement plyometrics into your training program.
Sets, Reps and Frequency Guidelines
The first rule of plyometric training is that less is more. Plyometrics are not conditioning exercises – they demand maximum effort and intensity with each repetition.
Reps: For most plyometric exercises, aim for 2-5 repetitions per set. You should be giving 100% effort to every single rep. If you’re doing sets of 15 box jumps, you’re not training power – you’re conditioning.
Sets: Begin with 2-3 sets per exercise and gradually increase the number of sets as you adapt. This is how you progressively overload with plyometrics – not by adding reps, but by adding high-quality sets.
Frequency: For most people, 1-2 days per week of plyometric training is sufficient. Advanced athletes might progress to 3 days, but this should be built up gradually.
Exercise Selection: Try to hit the “big three” movement planes each week:
- Vertical plyometrics (box jumps, vertical jumps)
- Horizontal plyometrics (broad jumps, bounds)
- Lateral plyometrics (lateral hops, skater jumps)
This ensures well-rounded power development that transfers to most sports, which require movement in all directions.
Exercise Progression: Stick with the same plyometric exercise for 3-6 weeks before progressing. This gives your body time to adapt to the specific movement pattern and load. Basic exercises like snap downs might be mastered quicker, while more complex variations require longer adaptation periods.
Implementation Strategies
There are several ways to incorporate plyometrics into your overall training plan:
Option 1: Pre-Strength Training The most common approach for time-constrained individuals is to perform plyometrics early in your workout, right after your warm-up. This ensures:
- You’re fresh and can give maximum effort
- Your nervous system is primed for the strength work that follows
- You can treat it as an extended, highly-specific warm-up
Option 2: Contrast Training More advanced athletes can pair plyometrics with strength exercises using post-activation potentiation (PAP). For example:
- Perform a heavy squat (at 70-85% of your max)
- Rest 2-3 minutes
- Perform a plyometric exercise like box jumps
Research shows this can increase power output in the plyometric exercise because your nervous system is already activated from the heavy strength work.
Option 3: Dedicated Plyometric Sessions Ideally, if time permits, have dedicated sessions for speed and plyometrics, separate from your strength training. This allows:
- Maximum freshness and quality
- Higher volume of plyometric work
- Better recovery between different training stimuli
For most people, the general recommendation is 2-3 days per week, with 2-5 sets of 3-5 reps per exercise, starting with the basics and progressing methodically through the five steps outlined above.
Conclusion
Whether you’re a beginner just starting out or an advanced athlete looking to optimize your training, this 5-step plyometric progression system provides a safe, effective roadmap to improve your athleticism.
By respecting the process and understanding the science behind plyometric training, you’ll not only enhance your performance but also reduce your risk of injuries and overtraining. The key is patience – build your foundation first, then gradually increase complexity and intensity.
Remember that plyometrics are a powerful training tool that demands respect. Focus on quality over quantity, perfect your landing mechanics before advancing, and listen to your body throughout the process.
Implement these guidelines, and you’ll find yourself jumping higher, moving faster, and performing better in virtually any athletic endeavor.
Need help improving your athletic performance with plyometrics? Schedule a FREE Discovery Call to see how we can help or contact us today for help with in-person sports performance training!