The Supine Band Straight-Arm Lat Pullover: Build Lats, Shoulder Mobility, and Core Control With Minimal Equipment
If you are looking for one of the most underrated upper body exercises you can do with almost no equipment, the supine band straight-arm lat pullover deserves a spot in your training. It builds the lats through a full range of motion, accommodates the resistance curve in a way that most cable and dumbbell variations cannot, reinforces proper pelvic mechanics, and even sneaks in some free ab and hamstring work along the way. Whether you train in a fully stocked gym or out of a garage with a single resistance band, this is a movement that delivers a surprising amount of value for very little setup.
In this guide I am going to walk you through exactly how to set the exercise up, how to perform it with intent, why it works the way it does from a biomechanical standpoint, the most common mistakes that rob people of its benefits, how to program it for different goals, and which athletes and lifters stand to gain the most from adding it to their routine.
Watch the video below on how to maximize this exercise.
What Is the Supine Band Straight-Arm Lat Pullover?
The supine band straight-arm lat pullover is a lat-focused pulling exercise performed lying on your back with a resistance band anchored above and behind your head. With your arms kept relatively straight, you pull the band in a long arc from an overhead, lengthened position all the way down toward your pockets, then control it back to full stretch. Because your arms stay straight throughout, the lats do the lion’s share of the work, with very little contribution from the biceps. The movement closely mirrors a standing straight-arm lat pulldown, but the supine position and the band tension change the entire feel and training effect.
If you have ever done a straight-arm pulldown on a cable stack, you already understand the basic pattern. The difference here is that you are flat on your back, you are using a band instead of a cable, and you are intentionally controlling your pelvis and ribcage to get more out of every repetition. That combination is what turns a simple accessory into a movement that trains your lats, your shoulder mobility, and your core all at once.
Equipment You Will Need
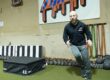
The beauty of this exercise is its simplicity. You only need two things. The first is a resistance band, and you can choose one as light or as heavy as you like depending on what you want out of the set. A lighter band is great for warm-ups, breathing work, and high-rep blood flow. A heavier band lets you load the movement as a true strength accessory. The second is a sturdy object you can anchor the band to that sits low to the ground, such as a kettlebell rack, the base of a power rack, a heavy piece of furniture, or any fixed point that will not move under tension.
To anchor the band, you simply choke it onto the object. Choking the band means looping it through itself around the anchor point so that it locks securely in place and will not slip while you pull. Take the band, wrap it around the rack or post, feed the rest of the band through the loop, and pull it tight. That self-locking choke is what keeps everything stable while you train.
How to Set Up and Perform the Exercise
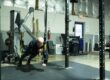
Once your band is choked to a low anchor, lie down on your back with your head pointed toward the anchor, the same way you would position yourself for a standard crunch. Your feet stay planted flat on the floor with your knees bent. This foot position is not an afterthought; it is one of the keys to the whole exercise, which I will come back to in a moment.
Reach back and grab the band with both hands, then scoot your body away from the anchor until you feel a solid amount of tension in the fully lengthened, overhead position. You want real resistance at the stretch, not slack. If the band goes loose at the top of the movement, slide a little further away until the stretch position is genuinely challenging.
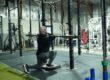
Before you pull, set your position. Drive your feet into the floor and use your hamstrings to anchor yourself so you are not sliding around. Tuck your pelvis slightly into a posterior tilt, keep your lower back relatively flat and neutral against the ground, and keep your ribs down rather than letting them flare toward the ceiling. This is your foundation. From here, keep your arms straight and pull the band in a long sweeping arc, bringing your hands all the way down toward your pockets. Squeeze your lats hard at the bottom, hold that contracted position for a brief second, and then control the band back up overhead until you reach a full, lengthened stretch. Pause briefly in that stretch, then repeat.
The goal on every rep is a big, honest range of motion. Get long and lengthened at the top, then squeeze hard and finish all the way down by your sides. Do not cut the range short on either end. The full arc, performed with control and intentional pelvic positioning, is where all the benefits live.
Why This Exercise Works: The Biomechanics
The lats are an enormous muscle group with a wide range of functions, and one of their primary jobs is shoulder extension, which is exactly the action of bringing your arms from overhead down toward your hips. A straight-arm pulling pattern isolates that shoulder extension function beautifully because the elbows stay locked out and the biceps cannot take over. That is why the straight-arm pullover and pulldown family of movements is so effective for targeting the lats directly.
What makes the band version special is how it loads the resistance curve. With a standard straight-arm cable pulldown, the stretched position is heavily emphasized and feels demanding, which is great, but the contracted position at the bottom tends to feel easy for most people because the cable angle offers little resistance there. A band does the opposite at the bottom of this movement. As you pull your hands down toward your pockets, the band continues to stretch and the tension keeps climbing, so the contracted position stays hard. You are strengthening the lats not just in the stretch but all the way through to the finish, accommodating the strength curve in a way the cable misses. This is precisely why pairing band work with cable work over the long run is ideal; each tool covers a portion of the strength curve the other tends to neglect.
The supine position adds another layer. Because you are on your back with your feet rooted and your hamstrings holding you in place, you can drive your pelvis into a posterior tilt and keep it there while your arms travel overhead. Reaching overhead with the arms is something a huge number of people cannot do without compensating by arching the lower back and flaring the ribs. By using your hamstrings to lock your pelvis underneath you, you train the lats in their lengthened, extended position while keeping your spine in a stacked, neutral posture. Over time, owning that position can actually improve your overhead shoulder mobility, because you are teaching your body to achieve overhead range without dumping into lumbar extension.
There is a bonus here too. Holding that braced, anchored position throughout the set demands work from your abs to maintain the posterior tilt and from your hamstrings to keep you stable. So while the primary target is your lats, you are also collecting free abdominal and hamstring engagement on every repetition. Individually these are small benefits, but they stack up meaningfully over the course of a training block.
Common Mistakes to Avoid
The most frequent mistake is letting the lower back arch as the arms reach overhead. If your ribs flare and your spine peels off the floor at the top of the movement, you have lost the entire postural benefit and you are simply borrowing range from your lumbar spine instead of your shoulders and lats. Keep the ribs down, keep the pelvis tucked, and only reach as far overhead as you can while maintaining that position. As your mobility improves, your honest range will improve with it.
The second mistake is not using enough band tension in the stretch position. If you set up too close to the anchor, the band goes slack at the top and the lengthened portion of the movement, which is where so much of the value lives, becomes pointless. Scoot away until the stretch is genuinely loaded.
A third mistake is bending the elbows and turning the movement into something closer to a pulldown or a row. The arms should stay relatively straight throughout. A soft, fixed bend in the elbow is fine, but actively flexing and extending the elbows shifts the work away from the lats and into the arms.
Finally, many people rush the reps and skip the brief pauses at the stretch and the contraction. Those short holds are what build control and connection. Hold the stretch for a beat, hold the squeeze for a beat, and you will get far more out of every set.
How to Program the Supine Band Straight-Arm Lat Pullover
This exercise is versatile enough to fill several different roles in a program, and your sets and reps should match the job you want it to do.
If you are using it as a warm-up or primer before an upper body session, one to two sets of ten to fifteen repetitions is plenty to get things moving. I particularly like it in this role ahead of bench pressing, overhead pressing, or athletic movements like throwing, because it wakes up the lats, grooves good pelvic and ribcage positioning, and prepares the shoulders to move overhead safely. It primes the upper body without creating fatigue.
If you are using it as a standalone accessory, two to four sets of ten to twenty repetitions works well. This is the range where you can really drive blood flow into the lats and upper body while continuing to reinforce proper pelvic mechanics. Tacking a few high-rep sets onto the end of a training day is a great way to add quality lat volume, especially when you are training with minimal equipment and want effective upper back work without machines.
If you are using it specifically for breathing mechanics or positional work, one to two sets of around ten reps, with your full attention on maintaining the posterior pelvic tilt and keeping the ribs stacked over the pelvis, will accomplish a lot. In this context the load matters less than the quality of position; you are using the movement as a tool to teach your body how to organize itself.
Anything in between these prescriptions can be justified depending on your goal. The exercise scales gracefully, so let your intent guide the volume.
Who Should Use This Exercise?
Because it requires so little equipment and offers such a broad set of benefits, this movement fits an enormous range of people. Lifters training at home or in a garage gym get a genuinely effective straight-arm lat pulldown alternative without needing a cable stack. Powerlifters and bench press specialists can use it as a primer to engage the lats and set good positioning before heavy pressing. Overhead athletes such as swimmers, throwers, and anyone whose sport demands repeated overhead reaching benefit from the combination of lat strengthening and overhead mobility work. Combat sports athletes, including wrestlers, grapplers, and strikers, can use it to build lat strength and control while reinforcing the rib-down, pelvis-tucked positioning that protects the spine. And general fitness clients who struggle to reach overhead without arching will find it a patient, effective way to build both strength and mobility at the same time.
For anyone with limited shoulder mobility in particular, this exercise can be a quiet game-changer. By anchoring the pelvis with the hamstrings and only working within the range you can control, you gradually expand your usable overhead range without forcing it and without compensating through the lower back.
Final Thoughts
The supine band straight-arm lat pullover is proof that you do not need a wall of machines to train your lats effectively. With a single band and a sturdy anchor, you can build lat strength across the entire range of motion, accommodate a resistance curve that most equipment ignores, improve your overhead shoulder mobility, and pick up free core and hamstring work in the process. Use it as a primer before pressing, as a high-rep accessory at the end of a session, or as a focused positional drill, and it will reward you either way.
Dial in your foundation first. Plant the feet, brace through the hamstrings, tuck the pelvis, keep the ribs down, and chase a full, honest range of motion on every rep. Master those details and this simple movement will do a great deal for your upper body strength, your posture, and your long-term shoulder health.