Copenhagen Dips: The Ultimate Groin Strengthening Exercise for Athletes and Fitness Enthusiasts
Copenhagen dips represent one of the most effective yet underutilized exercises for developing adductor strength, hip stability, and core control. This dynamic movement builds upon the foundation of the Copenhagen plank, transforming it into an active exercise that challenges your groin muscles through their full range of motion while simultaneously engaging your core stabilizers.
Watch the video below on how to maximize this exercise.
What Are Copenhagen Dips?
Copenhagen dips are an advanced bodyweight exercise that specifically targets the adductor muscles (your inner thigh muscles) while providing significant core strengthening benefits. Unlike static holds, this exercise involves controlled lowering and lifting movements that strengthen your adductors through both the lengthening and shortening phases of muscle contraction.
The exercise gets its name from the Copenhagen plank position that serves as its foundation, but the “dip” component adds a dynamic element that makes it particularly valuable for injury prevention and athletic performance enhancement.
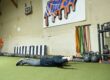
Equipment Needed for Copenhagen Dips
The beauty of Copenhagen dips lies in their simplicity and accessibility. You’ll need minimal equipment to get started:
Primary Equipment Options:
- A sturdy bench (ideal height around knee level)
- A chair or couch
- Bulgarian split squat pad
- Exercise box or step platform
The key consideration is finding an object that positions your leg at approximately knee height. This positioning allows for optimal range of motion while maintaining proper form throughout the movement. You can adjust the height based on your flexibility and strength level, with lower surfaces making the exercise easier and higher surfaces increasing the challenge.
Step-by-Step Copenhagen Dips Technique
Understanding proper form is crucial for maximizing the benefits of Copenhagen dips while minimizing injury risk. Here’s how to execute this exercise with perfect technique:
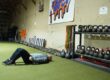
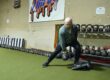
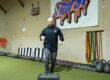
Setup Position
Begin by positioning your chosen surface at an appropriate height. Place your top leg (ankle or mid-shin area) on the surface, with the contact point somewhere between your knee and ankle along your tibia. Your bottom leg should be positioned at roughly a 90-degree angle to avoid contact with the ground or surface.
Body Alignment
Establish a side plank position with your body forming a straight line from ankle to head. This alignment is critical—avoid letting your hips sag backward, as this reduces adductor engagement and compromises the exercise’s effectiveness. Your top leg should support most of your body weight during the movement.
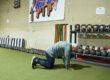
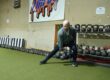
The Dip Movement
From the starting position, slowly lower your hips toward the ground by allowing your adductors to lengthen. Focus on controlling this descent rather than simply dropping down. You should feel a gentle stretch through your groin area as you reach the bottom position.
The Recovery Phase
Using your top leg’s adductor muscles, actively pull yourself back up to the starting position. This upward movement should be initiated by your groin muscles rather than momentum or compensatory movements from other muscle groups.
Common Copenhagen Dips Mistakes to Avoid
Many people struggle with Copenhagen dips because they make fundamental form errors that reduce effectiveness and increase injury risk:
Sagging Hip Position: The most common mistake involves allowing the hips to lag behind the body’s alignment. This creates a disconnected movement pattern that fails to properly engage the adductors and places unnecessary stress on the hip joint.
Insufficient Range of Motion: Some individuals avoid the full lengthening phase due to discomfort or fear. However, the eccentric (lowering) portion of the movement is crucial for developing strength through the complete range of motion.
Rushing the Movement: Copenhagen dips require controlled, deliberate movement patterns. Moving too quickly reduces muscle activation and increases the likelihood of form breakdown.
Modifications and Progressions
Copenhagen dips can be modified to accommodate different fitness levels and gradually build strength:
Making It Easier
If you’re struggling with the full movement, try these modifications:
- Move your leg closer to the surface to reduce the lever arm length
- Use a lower surface to decrease the range of motion required
- Perform partial range of motion movements initially
Making It Harder
Advanced practitioners can increase the challenge by:
- Using a higher surface
- Adding a pause at the bottom position
- Performing the movement more slowly
- Adding external weight (though this is rarely necessary)
Benefits of Copenhagen Dips
Copenhagen dips offer numerous advantages that make them valuable for various populations:
Injury Prevention: Strong adductors play a crucial role in preventing groin strains, hip injuries, and knee problems. The exercise specifically addresses the weakness patterns commonly seen in athletes and active individuals.
Athletic Performance: Improved adductor strength contributes to better lateral movement, change of direction capabilities, and overall lower body power development.
Core Strengthening: The side plank component provides excellent oblique and deep core muscle activation, making it an efficient exercise for targeting multiple muscle groups simultaneously.
Functional Movement: The movement pattern closely mimics real-world activities and sports movements, making the strength gains highly transferable.
Programming Copenhagen Dips
For optimal results, incorporate Copenhagen dips into your routine 2-4 times per week. Start with 2-3 sets of 8-12 repetitions per side, focusing on quality over quantity. As you develop strength and control, you can progress to 3-4 sets of 12-15 repetitions.
Copenhagen dips work excellently as part of a warm-up routine before squats, deadlifts, or running activities. They also integrate well into core training sessions alongside exercises like dead bugs, side planks, and loaded carries.
When to Use Copenhagen Dips
This exercise serves multiple purposes in a well-rounded fitness program:
Pre-Workout Activation: Use Copenhagen dips as part of your warm-up routine to activate the adductors and prepare your hips for training.
Injury Rehabilitation: Under proper guidance, Copenhagen dips can help rehabilitate groin injuries by gradually rebuilding strength and mobility.
Athletic Training: Include them in sport-specific training programs to enhance performance and reduce injury risk.
General Fitness: Incorporate them into your core training routine for comprehensive strength development.
Copenhagen dips represent a sophisticated approach to adductor strengthening that goes far beyond simple stretching or basic strengthening exercises. By mastering this movement, you’ll develop the hip stability and core strength necessary for optimal movement quality and injury prevention. Start with the basic version, focus on perfect form, and gradually progress as your strength and control improve.