
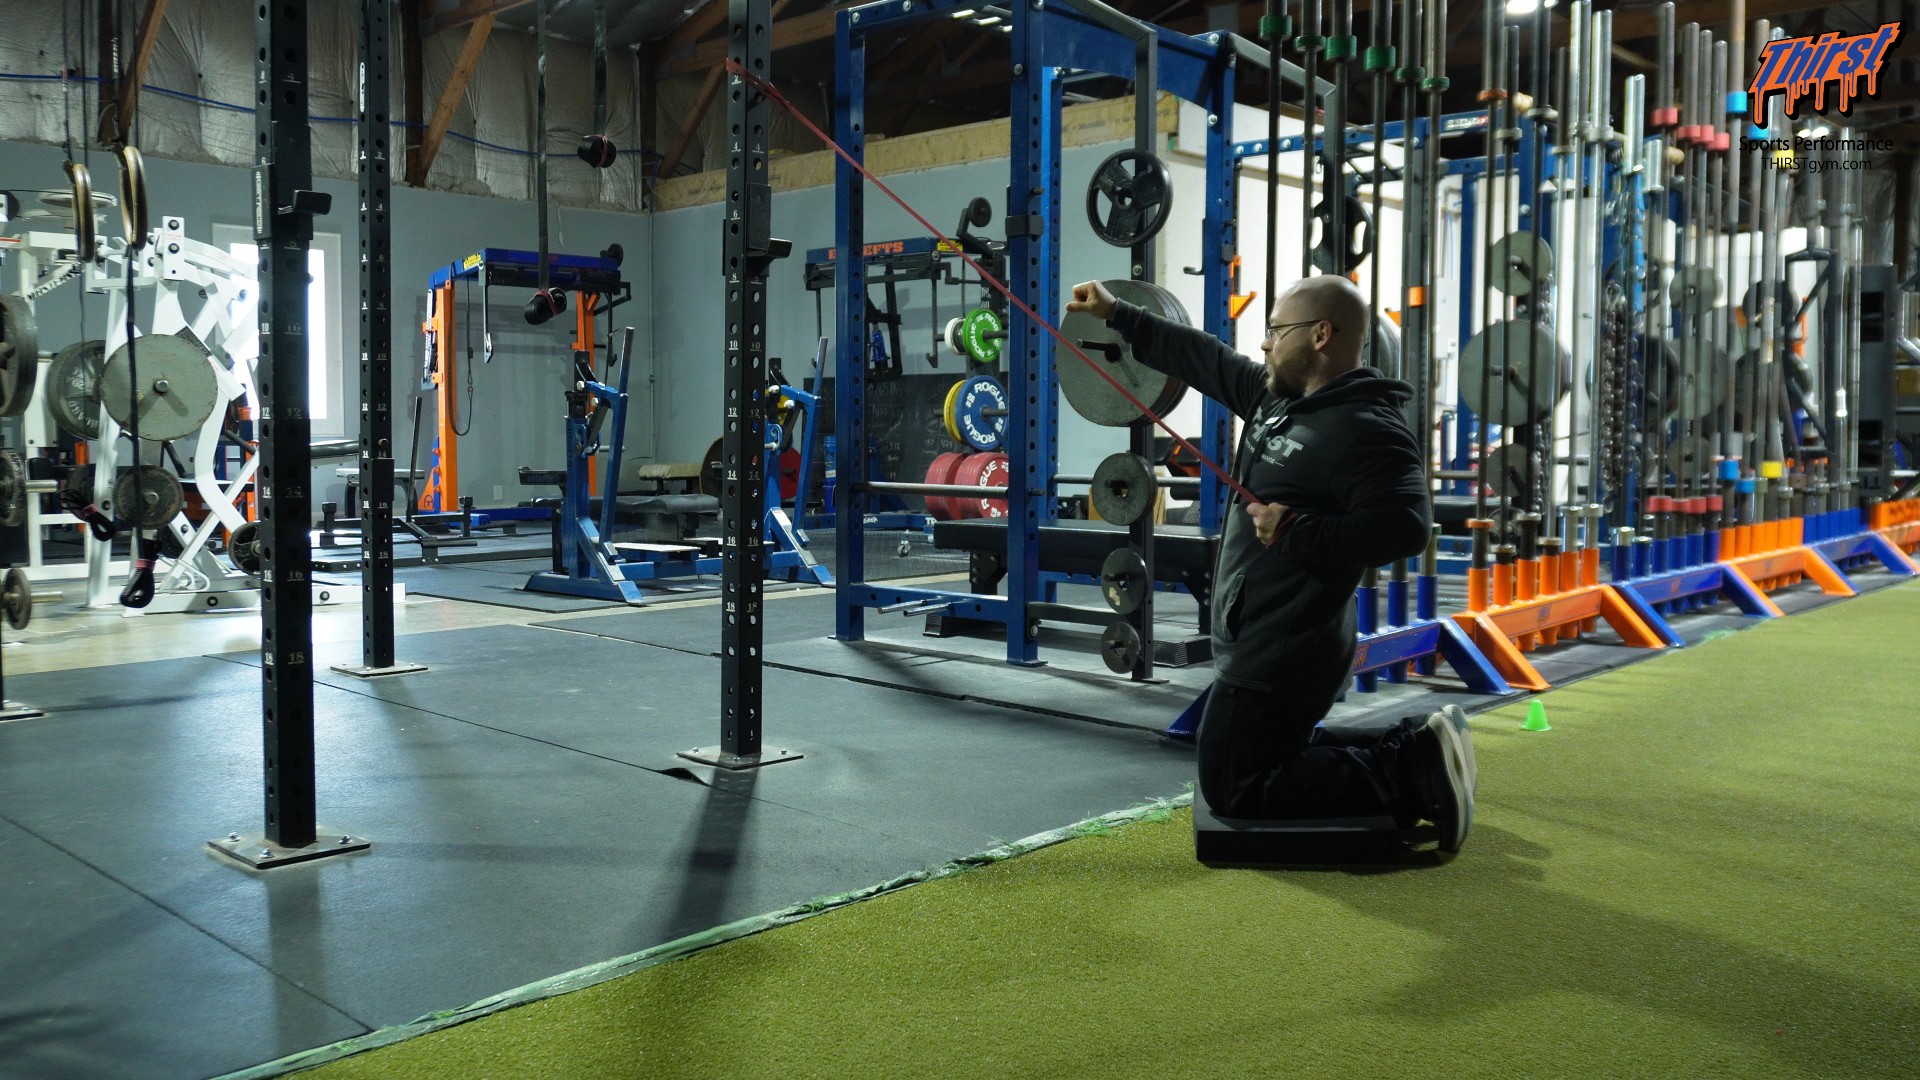
Tall Kneeling Single Arm High Band Row with Opposite Reach: Setup, Coaching Cues, and Programming
The tall kneeling single arm high band row with opposite reach is one of those exercises that doesn’t look like much on paper. It won’t add plates to your deadlift, and it won’t pack slabs of muscle onto your upper back. What it will do is teach an athlete to control their pelvis, move their rib cage independently of their spine, and row without turning the whole torso into the prime mover. For a lot of athletes and clients, that’s the missing link between a sloppy row and a strong one.
This is a positional exercise, and it should be coached as one. Load it lightly, set it up carefully, and use it to build the awareness that makes heavier rowing variations productive later.
Watch the video below on how to maximize this exercise.
What This Exercise Actually Trains
Strip away the name and you have three things happening at once. The lower body is holding a tall kneeling position, which means the glutes and hamstrings are working to keep the pelvis stacked underneath the ribs. The working arm is pulling a band down and back from an overhead anchor. The non-working arm is reaching across the body, which drives rib cage motion and gives the serratus and obliques something to do.
That combination is what makes the exercise useful. Most people can row. Fewer people can row while keeping the pelvis underneath them and the rib cage moving the way it’s supposed to. This drill forces both.
The muscles you’ll feel are the lats, the posterior shoulder, the mid-back, the glutes and hamstrings holding the kneeling position, and usually the abdominals. That last one is free work most athletes don’t expect. If someone tells you their abs are burning during a rowing drill, the setup is probably right.
Equipment and Setup
You need a resistance band and a place to anchor it high. A power rack, a rig, a beam, or any solid overhead attachment point will work. The band should be tied off well above head height so that when you’re in a tall kneeling position, the line of pull comes down toward you at an angle rather than straight across.
A pad under the knees is worth the trouble. An Airex pad, a folded mat, or a piece of turf all do the job. Kneeling on bare concrete or a hard platform turns a positional drill into a tolerance test, and the athlete’s attention goes to their knees instead of their hips.
Band choice matters more than people expect. Too heavy and the athlete will lose the tall kneeling position the moment they pull, arching the lower back or sitting back onto the heels. Too light and there’s nothing to organize against. Start lighter than you think and only move up once the position holds through every rep.
How to Hold the Band
There are two options here. The first is to grab the band like a traditional handle, wrapping the fingers around it and pulling. That works fine and is what most people default to.
The preferred method is to pass the hand through the loop, bring the arm around, and hold the band with it wrapped around the back of the hand and wrist. This distributes pressure across a larger surface instead of digging a narrow strip of rubber into the fingers, and it lets the athlete stop thinking about grip and start thinking about position. That’s the whole point of the drill, so anything that removes a distraction is worth doing.
Neither grip is wrong. Use whichever one lets the athlete focus on the movement instead of their hand.
Getting Into the Tall Kneeling Position
Both knees go down, roughly hip width apart. Toes are dug into the turf or the floor behind you rather than flat with the tops of the feet down. Digging the toes in gives the hamstrings something to pull against and makes the position noticeably more active.
From there, drive the hips forward until they’re stacked directly over the knees. This is the part people skip. A true tall kneeling position means the glutes are squeezed, the hamstrings are engaged, and there’s a straight line from knee to hip to shoulder. The athlete should feel the posterior chain working immediately, before the band is ever pulled.
If they don’t feel it, they’re sitting back. The hips have drifted behind the knees, the lower back has taken over, and the drill has lost most of its value. Cue them to squeeze the glutes and push the hips forward until the sensation shows up.
The rib cage should be down, not flared. Think of the front of the ribs staying connected to the front of the pelvis. That’s the canister position, and holding it under the demand of a row is what this exercise is really asking for.
Executing the Row and the Reach
Start with the working arm long overhead, holding the band. The opposite hand starts up by the chest.
As you row the band down and back, the opposite arm reaches across the body toward the working side. The two arms are trading places. The rowing arm goes from long to short, the reaching arm goes from short to long. When the row finishes, the reach finishes.
On the way back, the pattern reverses. The rowing arm returns overhead under control while the reaching arm comes back to the chest.
Throughout all of it, nothing below the ribs should change. The glutes stay locked in, the hamstrings stay engaged, the hips stay stacked over the knees, and the torso stays square. The only things moving are the arms and the rib cage responding to them.
Complete the prescribed reps on one side, then switch arms and repeat.
Common Mistakes and How to Fix Them
The most common error is losing the hips. The athlete starts tall, then gradually sinks back toward the heels as fatigue accumulates. Watch the hip-to-knee line rather than the arms — if it changes, stop the set.
The second is extending through the lower back to create range of motion. The band pulls the arm up, the athlete arches to reach further, and now the ribs have flared away from the pelvis. Cue “ribs down” and shorten the range if needed.
Third is rotating the whole torso to finish the row. The shoulder blade should move on the rib cage, not drag the spine along with it. If the athlete’s chest is turning to face the working side, the band is too heavy.
Fourth is rushing. This drill is worthless at speed. Every rep should be slow enough that the athlete can feel where their pelvis is and what their rib cage is doing. If they can’t describe the sensation, they’re moving too fast.
The last one is treating the reach as decoration. The opposite arm isn’t along for the ride. It should reach with intent, actively pushing across the body, because that’s what drives rib cage motion and brings the serratus and obliques into the picture.
Coaching Cues That Work
A few short cues cover most of what you’ll need. “Hips through the door” gets the pelvis forward. “Squeeze your glutes like you’re finishing a hip thrust” gets the posterior chain online. “Ribs down and stacked” handles the torso. “Reach like you’re handing something to the person beside you” gets the opposite arm doing real work. And “row with your elbow, not your hand” keeps the athlete from turning it into a biceps curl.
Pick two at a time. Stacking five cues on one set gets you a confused athlete and a worse rep.
Sets, Reps, and Programming
One to three sets of eight to twelve reps per arm is the working range. That’s enough volume for the position to register and not so much that quality falls apart.
This fits best as part of a warm-up or as accessory work between heavier compound sets. Using it as filler work between squat or bench sets is efficient — it keeps the athlete moving without adding meaningful fatigue, and it reinforces a position that carries over directly to the main lifts.
It also works well early in a training block or during a deload, when the goal is movement quality rather than load. Program it two to three days per week while the athlete is learning it, then pull it back to a maintenance dose once the position becomes automatic.
Regressions and Progressions
If tall kneeling is too demanding, regress to half kneeling. The split stance gives more stability, and the athlete can focus on the row and reach without fighting for balance. From there, move to tall kneeling once the position holds.
To progress, the most useful variable is not band tension. Better options are adding a pause at the bottom of the row, slowing the eccentric to a three or four count, or increasing the reach distance so the rib cage has to travel further.
Once the athlete owns the position consistently, graduate them to harder rowing variations. Standing single arm cable rows, chest supported rows, dumbbell rows, and eventually heavy barbell rowing all become more productive when the athlete already knows how to keep their pelvis underneath them.
Who Should Use This
Beginners get the most out of it, because it builds the body awareness that everything else depends on. Wrestlers and combat sports athletes benefit because pelvic control and rib cage motion show up constantly in scrambles and positional battles. Powerlifters can use it as warm-up work to reinforce the bracing pattern they need under a bar.
General fitness clients who spend their day at a desk usually feel this one immediately, and older adults can use it as a low-risk way to train upper back strength and postural control without loading the spine.
The one group that gets limited value is the advanced athlete who already moves well. If they can already row heavy without compensating, spend the time elsewhere.
The Bottom Line
The tall kneeling single arm high band row with opposite reach is a teaching tool. It’s not a strength builder, and it’s not supposed to be. It’s a way to show an athlete what it feels like to keep the pelvis underneath them, move the rib cage on purpose, and row without cheating.
Use it for a few weeks, keep the load light, coach the position hard, and then move on to the heavier work it was designed to prepare them for.